
Instrument#
Simulated aeronautical instruments available in Air Navigation Pro are HSI, Altimeter, Chronometer, Compass, Flight info, RMI, Speed, VOR, and Variometer. For tablets, you can assign one instrument to the main view Configuration > Instruments and access others from the menu bar. On mobile phones, you can assign one instrument to the module tabs and access the others from the Config > Instruments.
HSI#
The top part of the screen is an emulated HSI (Horizontal Situation Indicator).
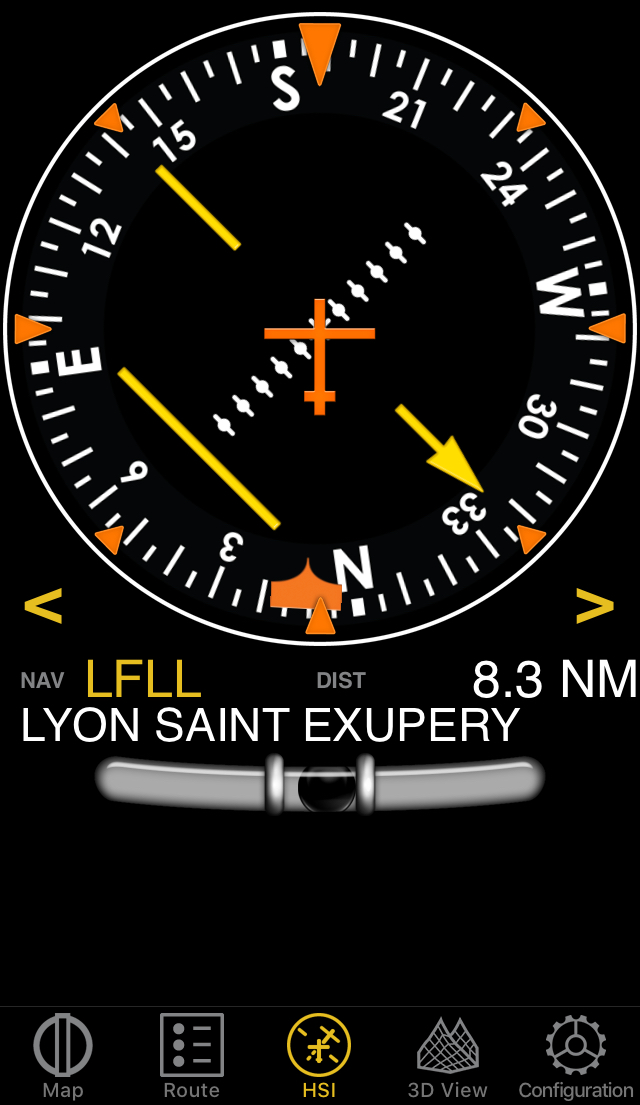
The HSI is simulated on top of a waypoint that you select.
The yellow needle is the course select pointer, the moving part in the middle is the course deviation indicator (CDI) which displays the deviation (+/- 12 degrees) from the selected radial or course to or from the selected waypoint. Unlike on a real HSI where the orange heading bug is used to set a course for the autopilot, the heading bug displays the bearing to the selected waypoint. Also, the HSI does not display a magnetic heading but the track of the aircraft.
The advantage of the HSI is that it displays the position of the aircraft symbol in the middle relative to the selected course. The compass card will rotate automatically to match the current flying track. Radial or course selection is done by touch and swipe gesture up or down on the left or right of the compass ring.
Below the main indicator, the selected waypoint (interactive) is displayed as well as the distance from the waypoint (great circle distance) and two arrows for manual calibration. You can use any kind of waypoint (Airports, VOR, NDB, etc) to be simulated in the HSI instrument. (A real HSI indicator requires radio signals from VOR, VOR/DME or VORTAC transmitters). A spinball is also available but for Phone devices only.
If the GPS reception is bad, the HSI is not reliable and the warning flag will show that the instrument does not display correct data.
VOR#
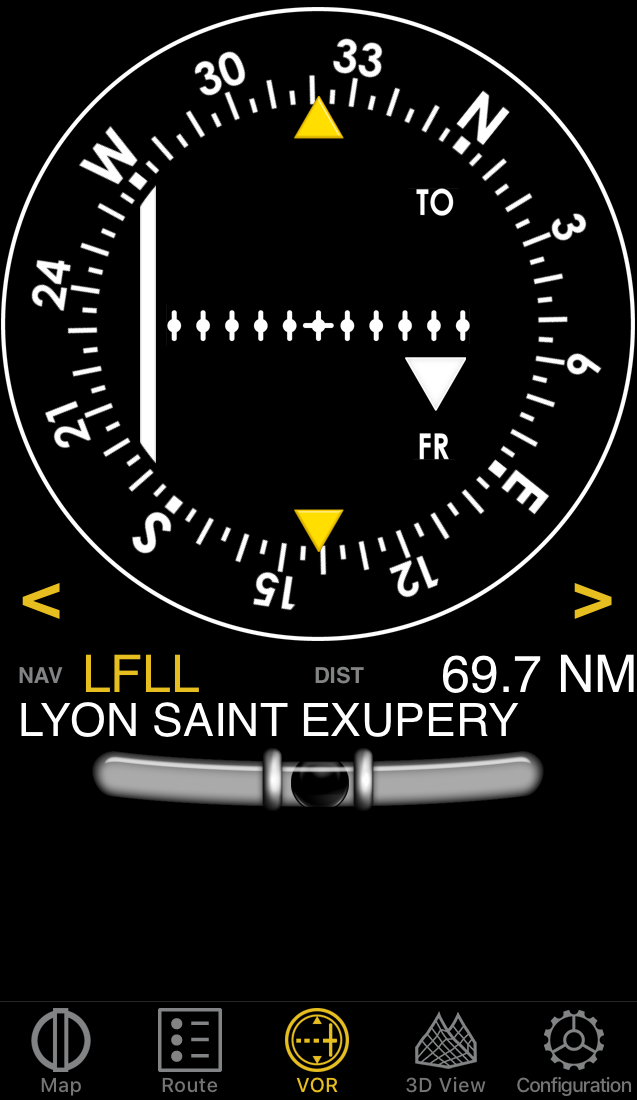
A VOR is simulated on top of the waypoint you select.
The VOR instrument uses GPS data to display the bearing to a waypoint.
The top part is an emulated VOR indicator. The white needle (course deviation indicator, CDI) displays the current deviation up to +/- 12 degrees relative to the selected radial to or from the course to the selected waypoint. Course and radial selection is done by touching and swiping gestures up or down on the left or right of the compass ring.
Below the main indicator, the name of the currently selected waypoint is displayed as well as the distance from the waypoint (great circle) and GPS accuracy. You can use any kind of waypoint (Airports, VOR, NDB, etc) with the VOR instrument (whereas a real-life VOR indicator requires radio signals from VOR, VOR/DME or VORTAC transmitters). A spinball is also available but for Phone devices only.
RMI#
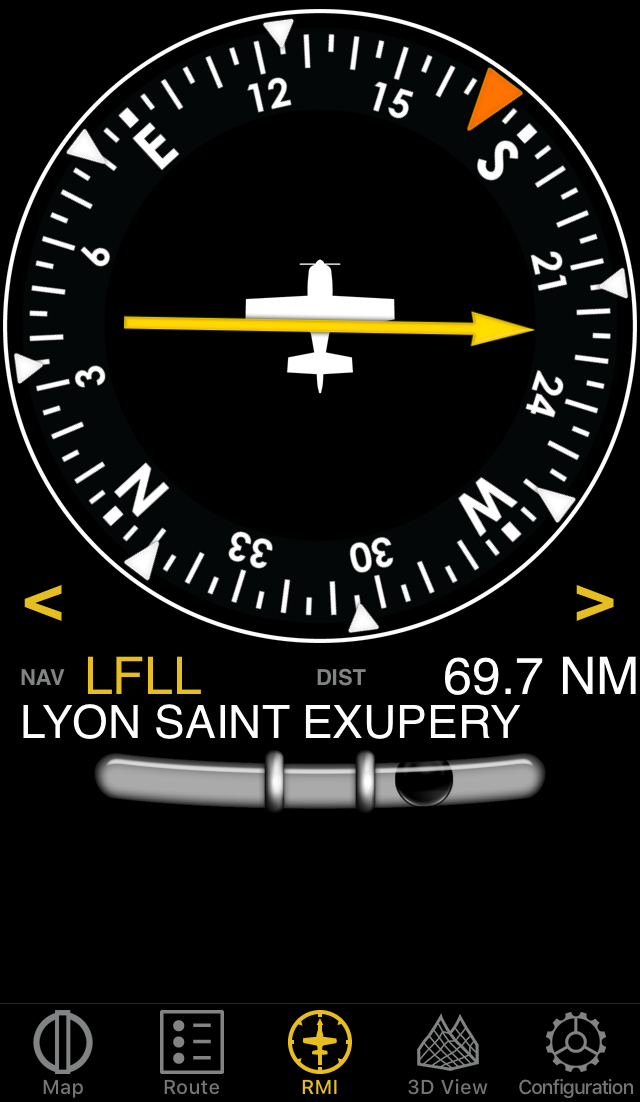
A RMI is simulated on top of a waypoint of your choice.
The RMI (Remote Magnetic Indicator) uses GPS data. The RMI has a synced heading, and a simple arrow (like the ADF) always pointing to the selected station.
Below the main indicator, the selected waypoint (interactive) is displayed as well as the distance from the waypoint (great circle distance) and two arrows for manual calibration. You can use any kind of waypoint (Airports, VOR, NDB, etc) to be simulated in the RMI instrument. A spinball is also available but for Phone devices only.
NAV target#
Simulate a waypoint in HSI/VOR/RMI#
Open instrument HSI/VOR/RMI module; for Tablets tap Resize or go to Instr, for Phones tap HSI/VOR/RMI at the module bar or go to Config> Instruments.
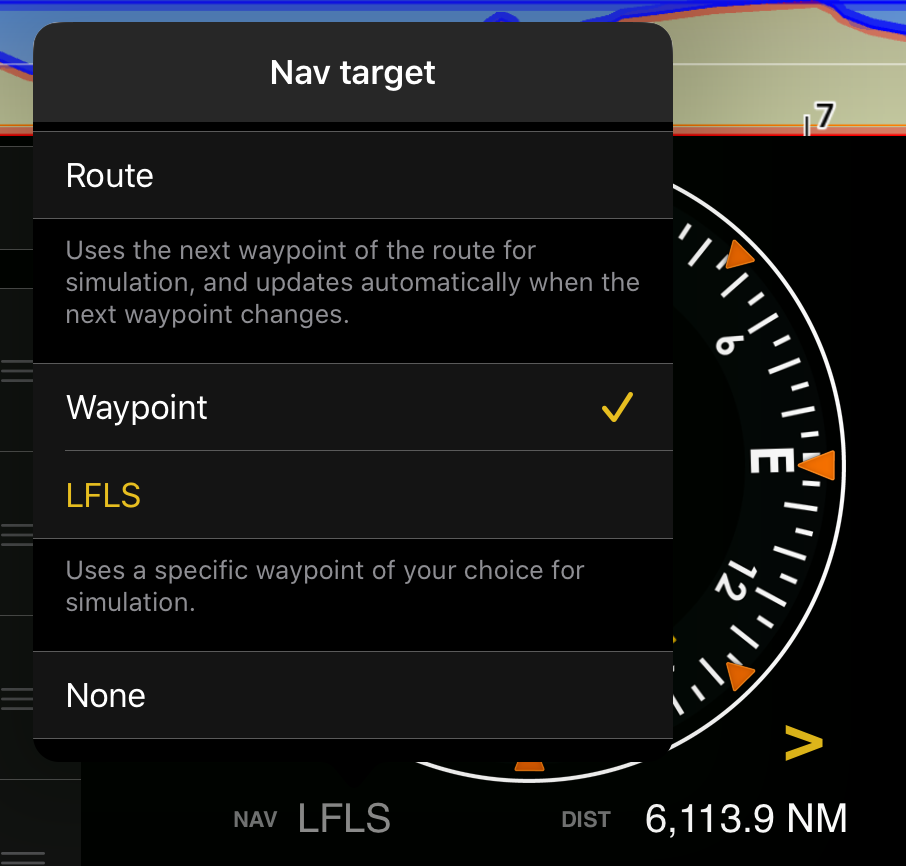
Tap the interactive button in yellow beside NAV (NONE by default)
In the Nav target window, select Waypoint
Tap the interactive button (NONE by default) to search for a Nearby waypoint in your location
Finally, tap/select the waypoint to simulate
Note
Alternatively, you can tap the waypoint on the moving map or in the waypoint search, then tap more options [… icon] and select Simulate HSI/VOR/RMI.
Set waypoints in your route to be simulated automatically in the HSI/VOR/RMI instrument#
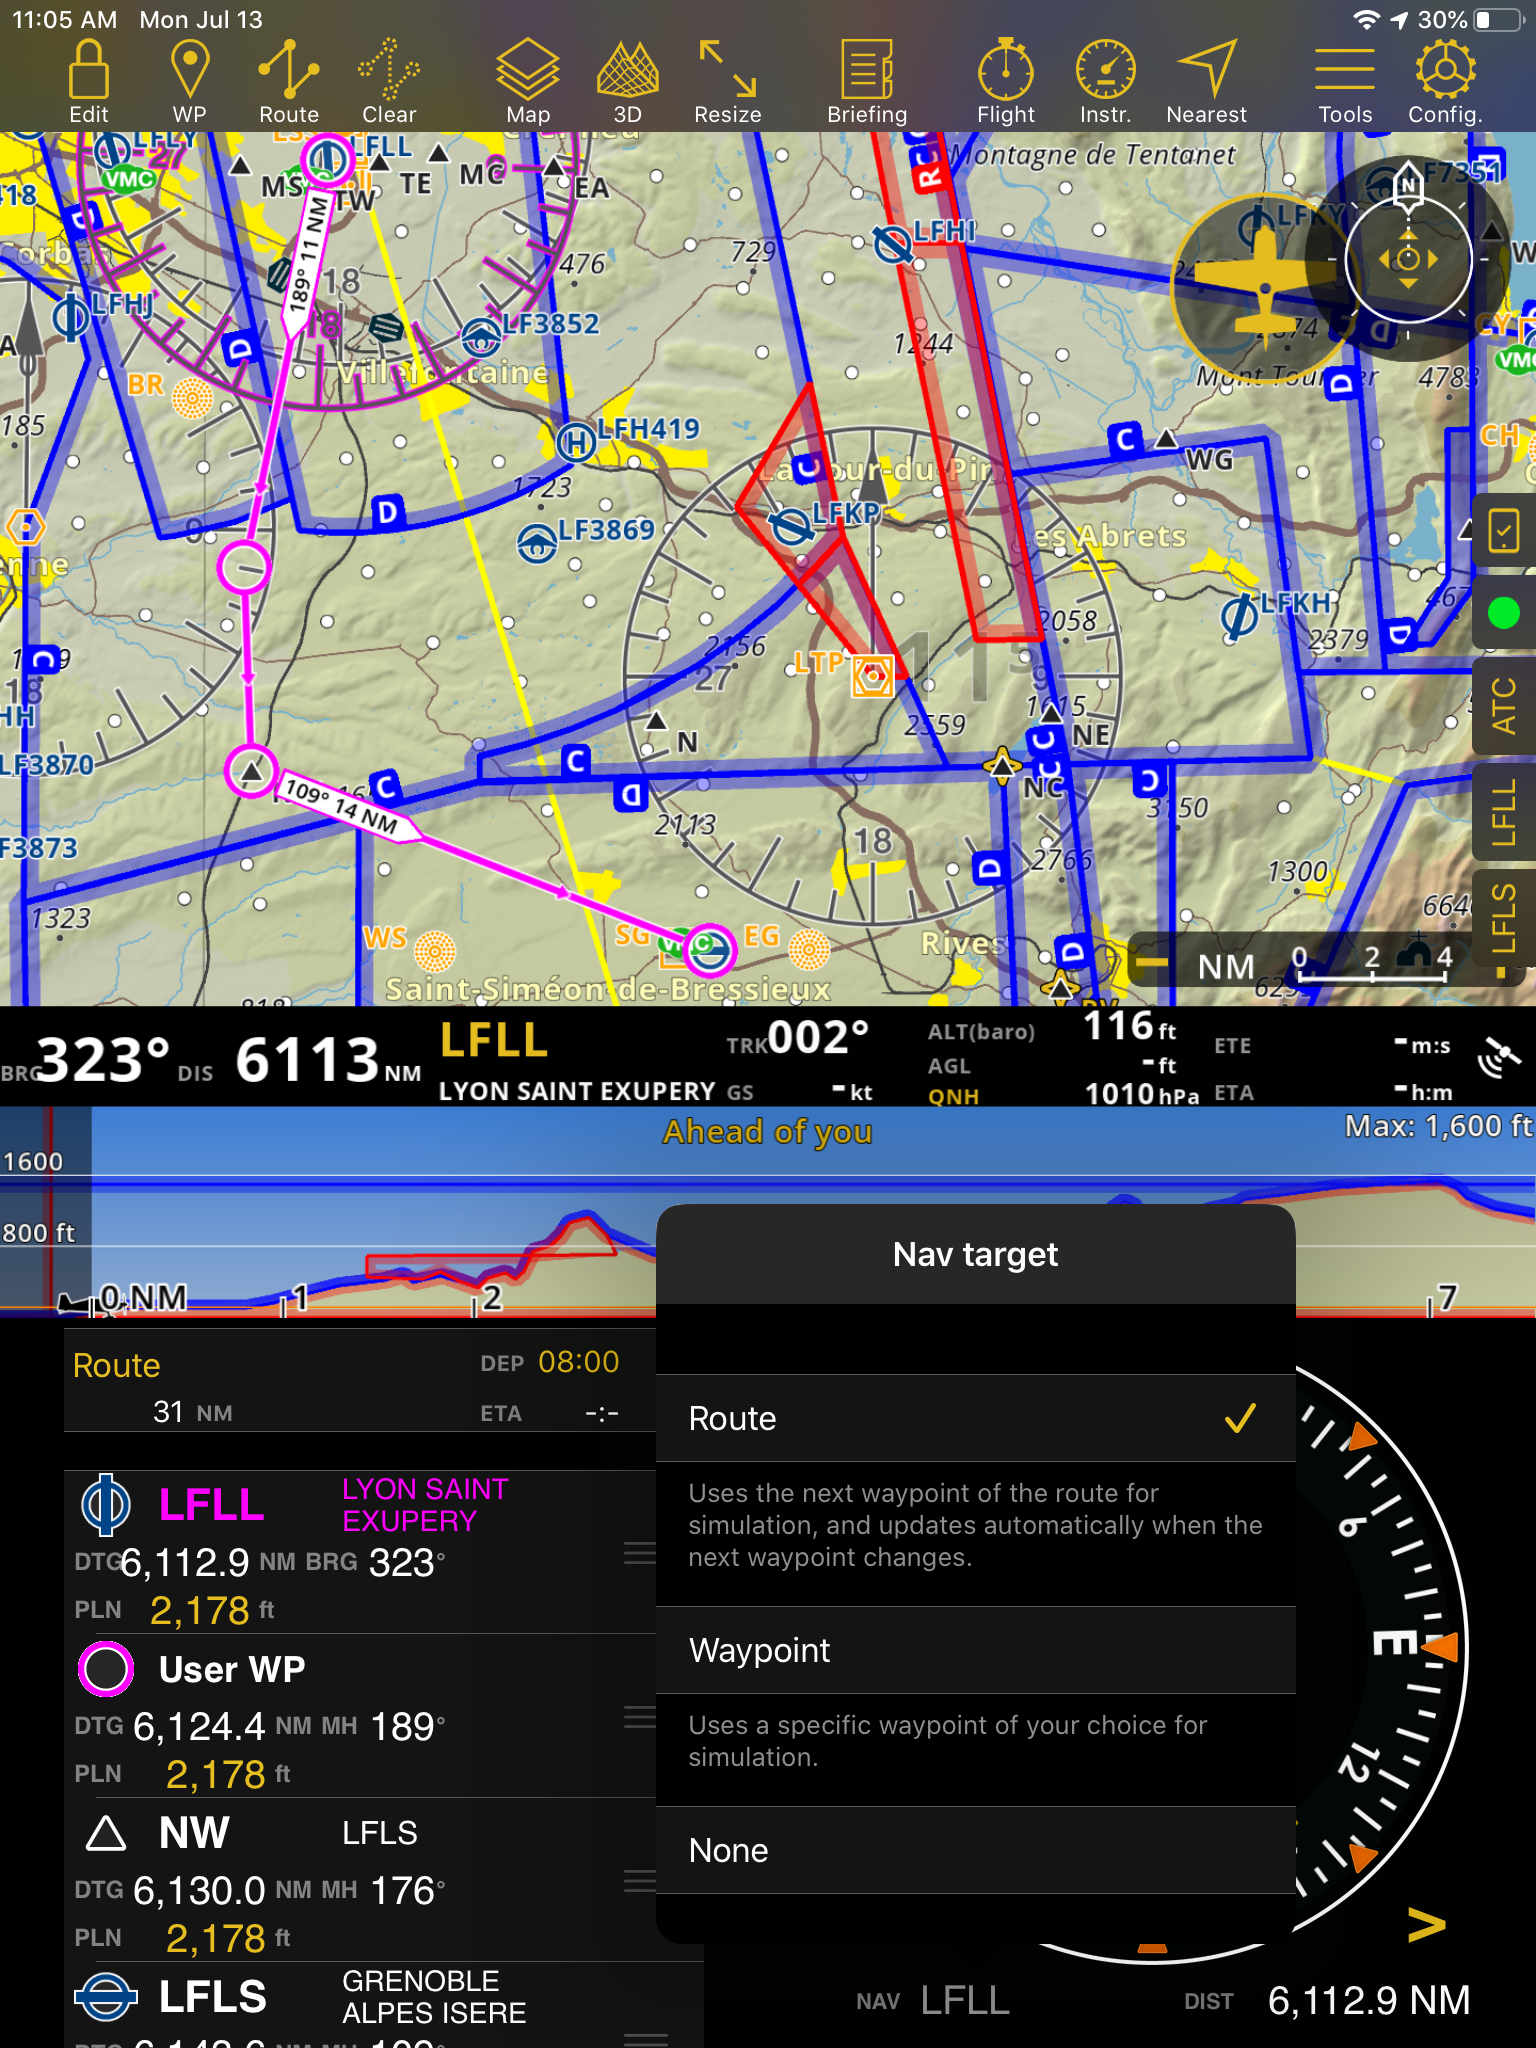
Open instrument HSI/VOR/RMI module; for Tablets tap Resize or go to Instr, for Phones tap HSI/VOR/RMI at the module bar or go to Config > Instruments.
Tap the interactive button in yellow beside NAV (NONE by default)
In the Nav target window, select Route
This uses the next waypoint of the route for simulation, and updates automatically when the next waypoint changes.
Altimeter#
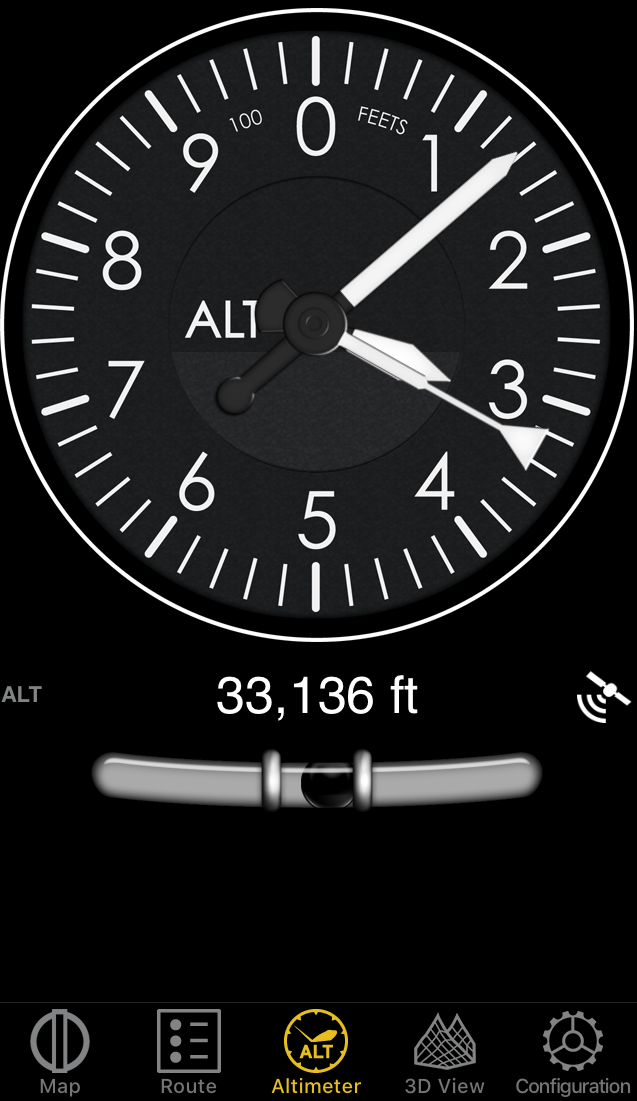
The Altimeter of Air Navigation Pro is GPS-based like all navigation instruments. Usually, the GPS has an acceptable precision. It should never be used as a replacement for the altimeter inside the cockpit.
The altimeter instrument of Air Navigation displays altitudes above Mean sea level (MSL) as measured by the mobile device. Usually, the altitude has an accuracy of 70 ft or less.
The top part is the analog altimeter indicator. On the bottom part, you will find the digital altimeter value as well as the current GPS status symbol.
The altimeter unit can be set as feet or meters in the application settings.
A Question mark will show instead of a digital altimeter value when is more than 230 ft
Note
on mobile phones, you will find the Spinball at the bottom.
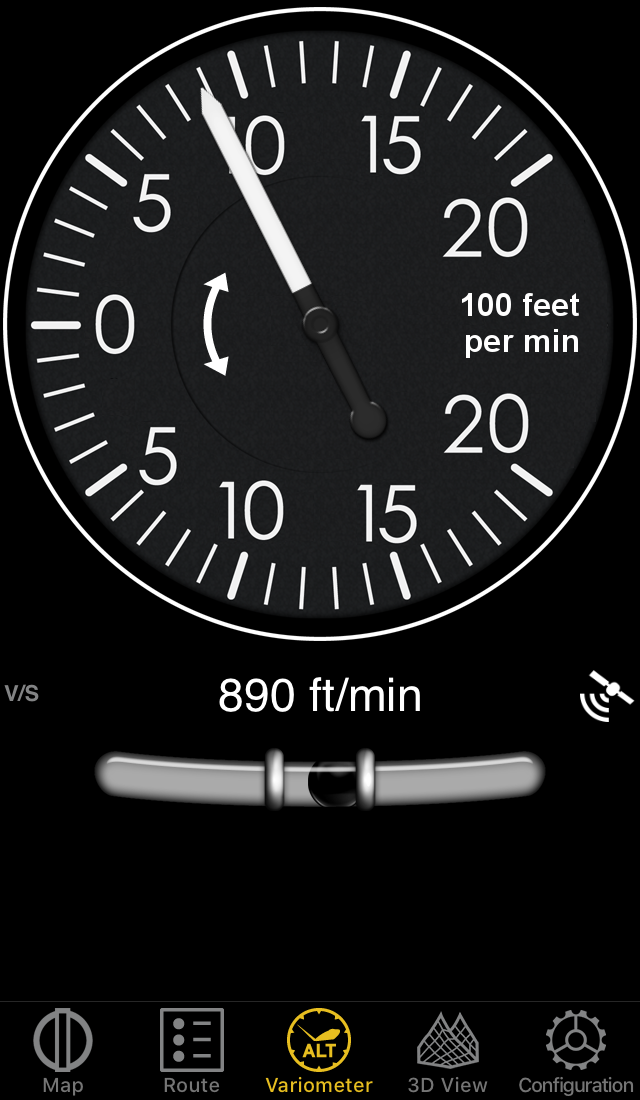
Variometer#
The variometer displays information by computing the data provided by a GPS antenna (external or internal). The information will show at the bottom bar of the instrument.
So far, the following devices can be used to get a more accurate variometer:
AHRS g mini
ASI Flynet2
If no signal is received, the satellite icon will turn red.
Sound alerts are supported for the variometer. You can enable them in Config > Settings > Audio effects.
Note
on mobile phones, you will find the spinball at the bottom.
Compass#
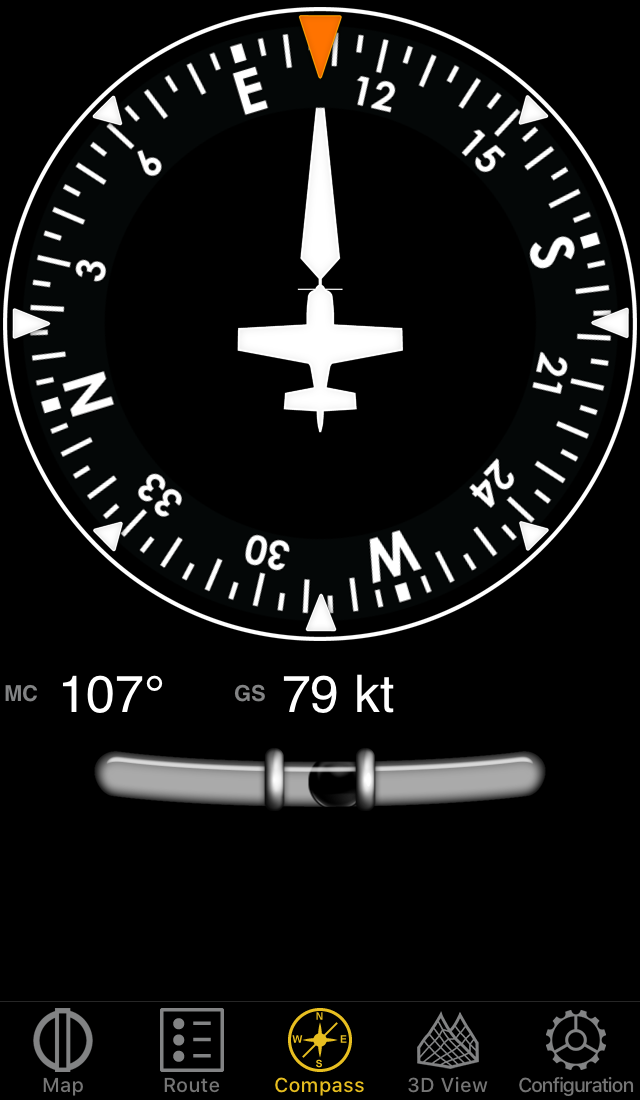
The Compass instrument displays the current course. It’s based on the direction the aircraft has just moved, and not based on the direction it’s pointing to. The course can be displayed either as a true course or magnetic course depending on the settings.
The outer ring is user adjustable by touching and sliding your finger up or down on the left or right of the compass indicator.
The bottom part contains the course and the current ground speed. Units are adjustable in the settings. If the course information is magnetic the digital course label will be “MC” (Magnetic Course) otherwise it will be “TC” (True Course).
Note
on mobile phones, you will find the spinball at the bottom.
Chronometer#
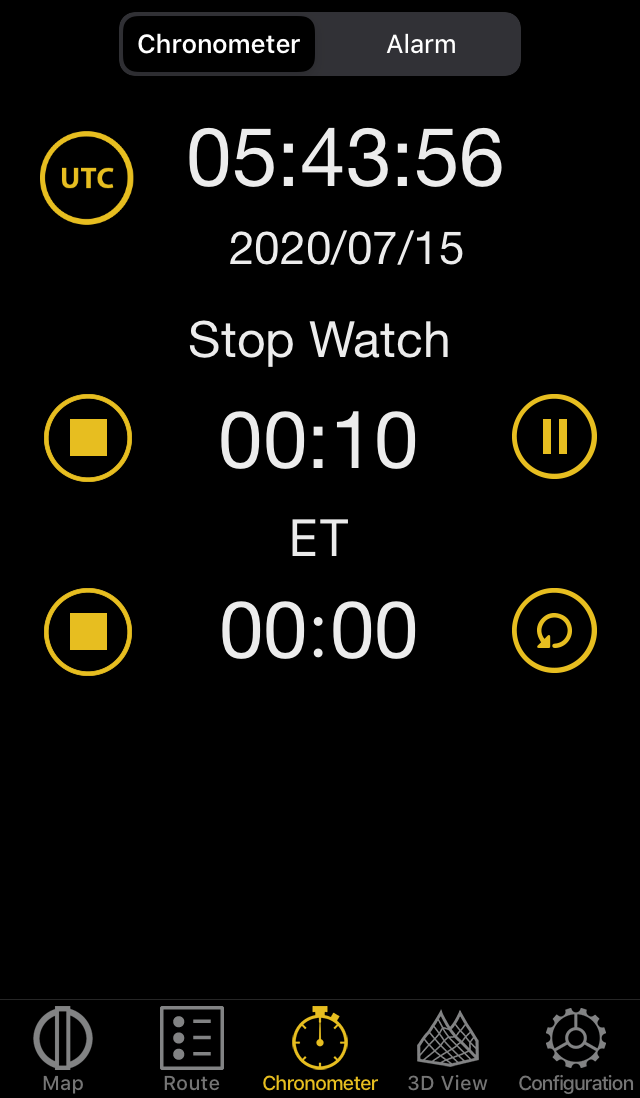
In this instrument window, we can see two tabs for Chronometer and Alarm that are displayed by default with UTC time and can be changed to your local time when tapped.
Chronometer#
You can START the Chronometer by tapping on its corresponding “Play” icon on the left.
When the StopWatch is running, you have the option to PAUSE IT with the “Stop” button on the left in replacement with the Play button.
With the StopWatch paused/stopped you can either select to RESTART the Chronometer by pressing the “Play” button on the left or to RESET the time by pressing the “Reset Arrow” button on the right.
Pressing on the “Pause” button on the right when the StopWatch is running will trigger the “Lap function”. The time will continue running but it will display the time of the moment when the “Pause” button was pressed.
Alarm#
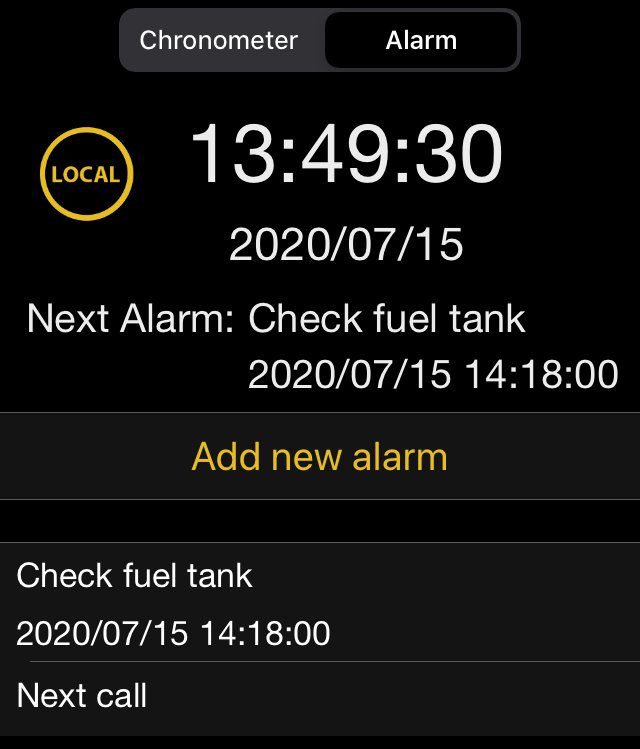
Alarms are helpful while flying to remind you of important things like checking/switching the fuel tank or calling ATC at a specific time or period. ANP will ask your permission to send you a notification when an alarm is triggered, to do so please go to your device’s notification settings to allow ANP notifications.
The following information are shown on the tab:
UTC/Local time
Next Alarm
List of created alarms
Setting an alarm#
In the Chronometer window, tap Alarm
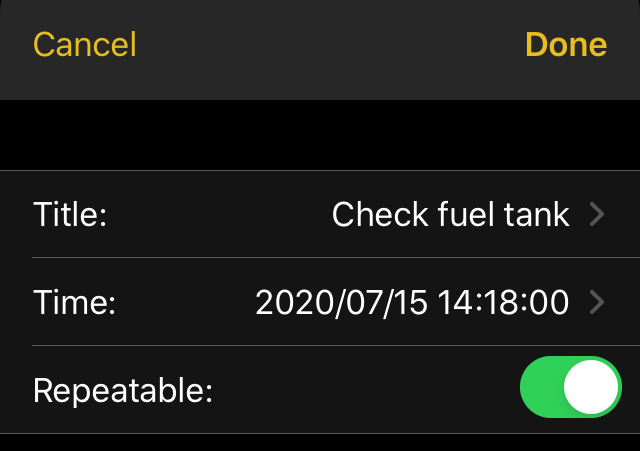
Under Alarm tab, tap Add new alarm. A new window will appear with fields for Title, Time and Repeatable.
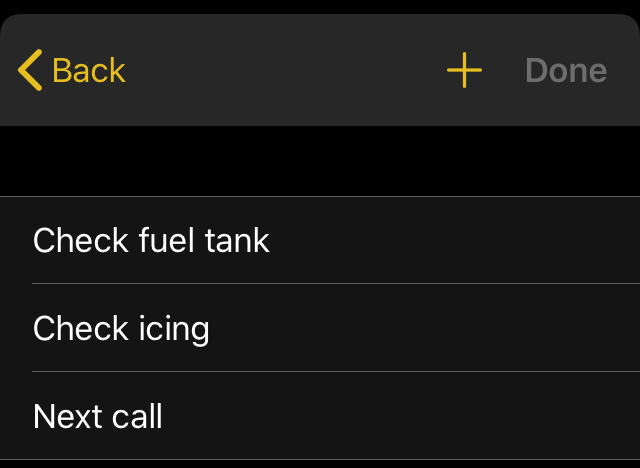
Select and input the Title of alarm by selecting one of the suggested choices or by tapping + icon to add custom title, then tap Done.
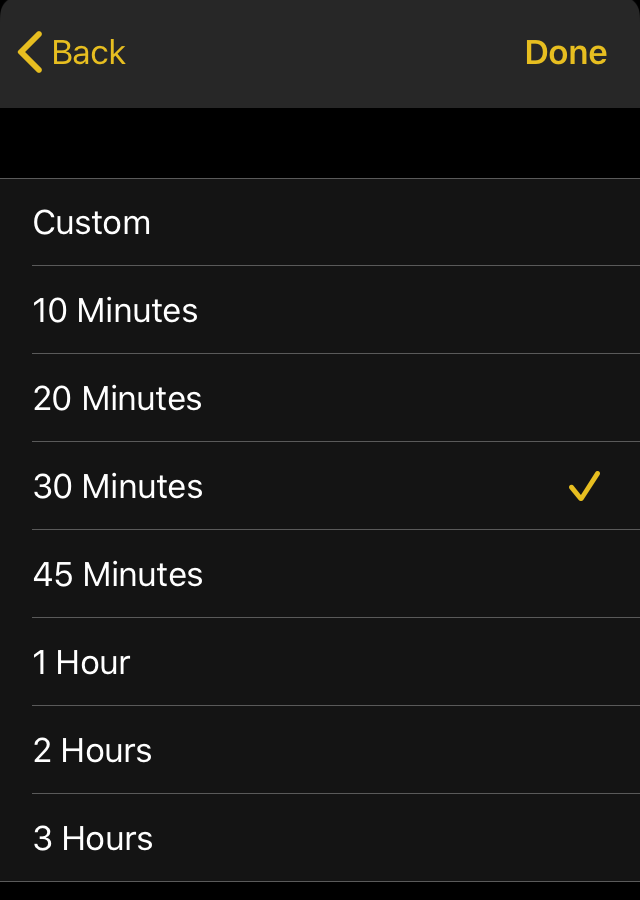
Select and set Time of alarm by selecting on the suggested list or by setting custom time, then tap Done.
Set the Repeatable toggle button to enable when opted by default disabled.
Finally, tap Done on the ‘Add new alarm’ window to save.
Note
When you enable the “Repeat” option, the time between the moment you set the alarm and the first time it goes off, is considered as the standard interval time. For example: if it’s 11.20 am and you set the custom alarm to set off at 12.04 pm, the next alarm will be repeated at 12.48 pm.
Deleting an alarm#
Select on the list the alarm you want to delete
Swipe from right to left to reveal Delete then tap.
Or swipe all the way to the left to instantly delete alarm
Speed#
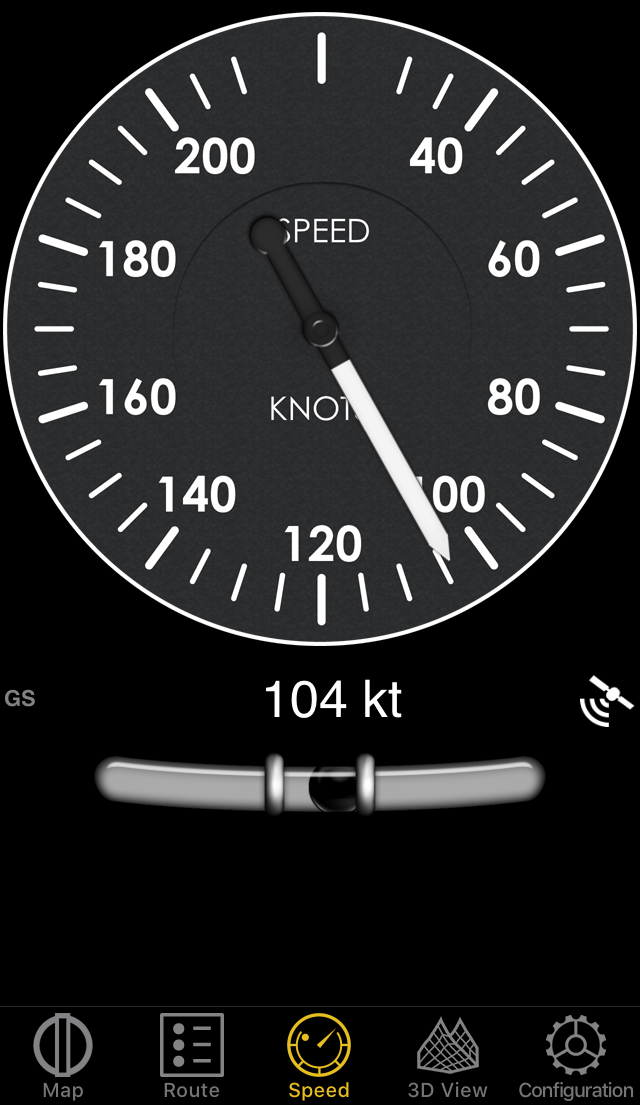
The top part is the analog ground speed indicator. On the bottom part, you will find the digital speed value and the current GPS status.
The speed unit can be set as knots, miles per hour or kilometers per hour in the application settings.
A Question mark will show instead of a digital altitude value when the GPS accuracy is bad.
Note
On mobile devices, you will find the spinball at the bottom.
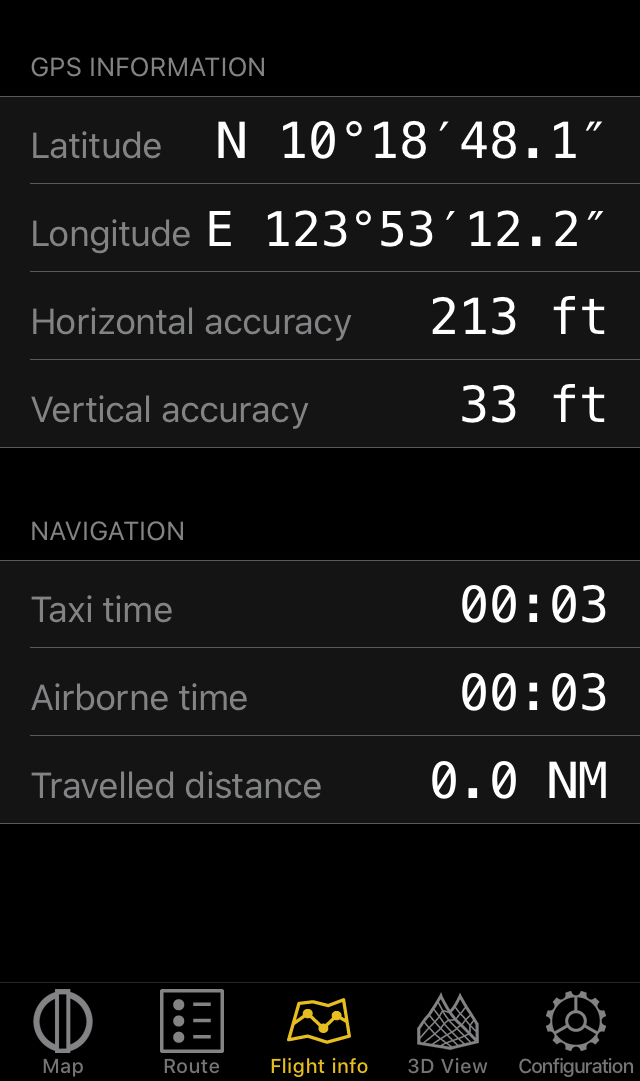
Flight info#
The flight information module displays a list of real-time navigation values in digital form.
It will also compute the flown distance since the application startup or from the moment the current flight was restarted in the ‘Flight time’ module.
The following are the information displayed:
GPS INFORMATION: Latitude, Longitude, Horizontal accuracy and Vertical accuracy
NAVIGATION: Taxi time, Airborne time and Travelled distance