

Route Planning#
You can navigate in Flight Mode by simply monitoring your GPS position on the Moving Map. However, to unlock the full potential of Air Navigation Pro, we recommend planning your route in advance and then preparing your flight using our Briefing feature.
Routes can be created and managed through the Moving Map, the Navigation Dashboard and the Routes Menu.
Route Creation#
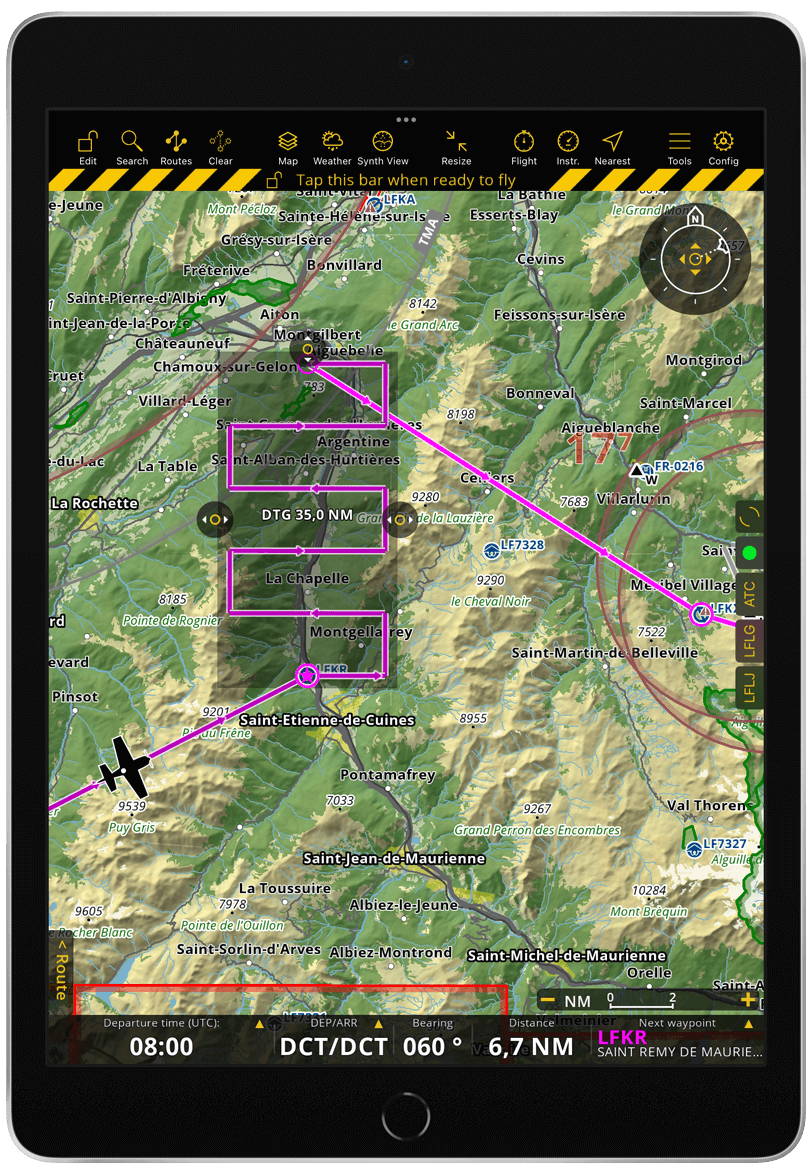
To begin, make sure the lock is open  indicating you are in Edit Mode. An under-construction striped line should also be visible at the top of the screen. If not, tap the
 ![]() icon to unlock it.
icon to unlock it.
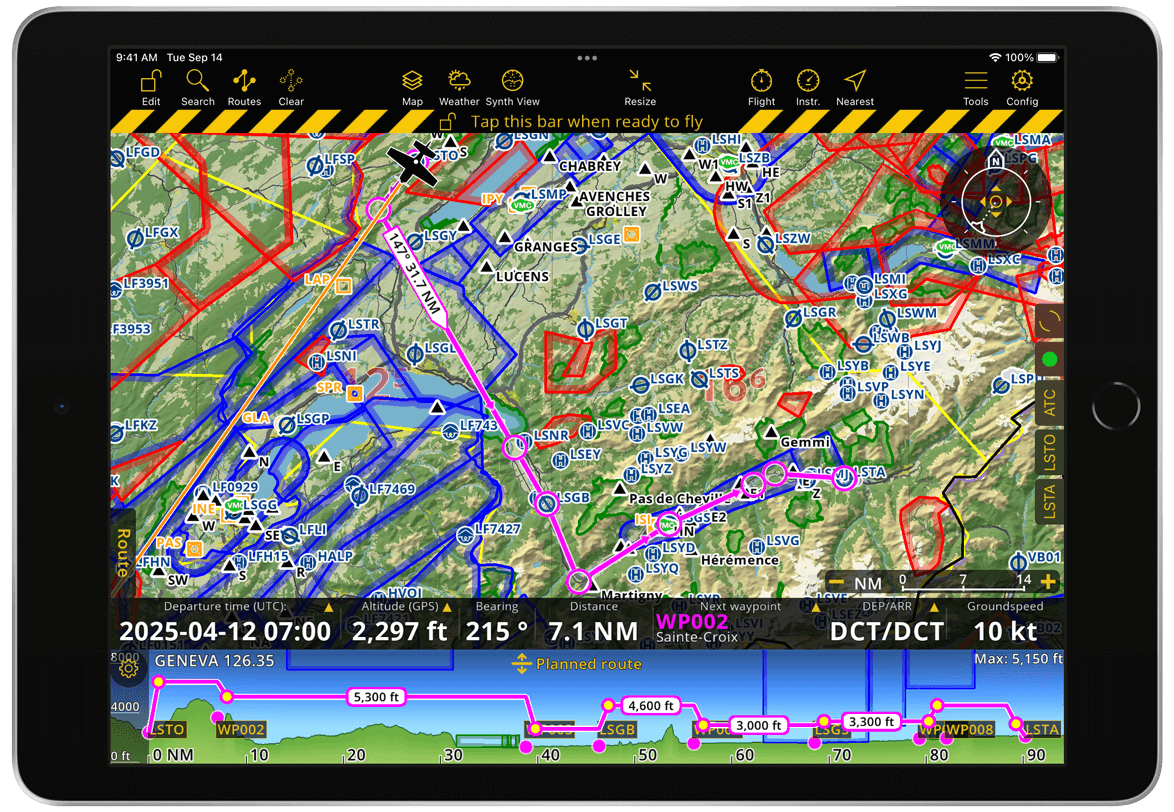
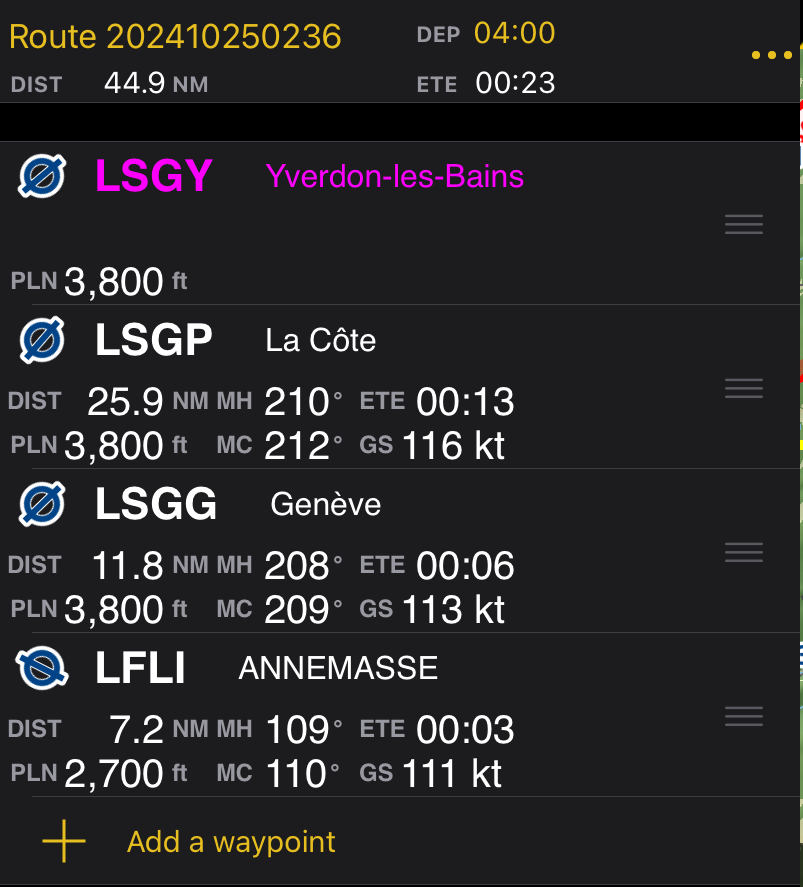
To create a route, you essentially just decide which waypoints to include and then add them to your route. A magenta line will connect all added waypoints, representing your planned route on the map. Each leg displays a label indicating the bearing angle relative to North and the distance between waypoints.
Depending on your preference, situation and needs, there are multiple ways to create your route. In this section, we will explore all available options, providing you with the necessary tools to plan your flight efficiently in just minutes.
Note
While creating your route, the app will download the required SmartChart data for the planned route with a corridor of 50 NM. Please wait until the ![]() appears in the Data downloads dock indicating that the download activity is finished and the map for your route is available for offline use. Airspaces, waypoints and obstacles, as well as installed third party aeronautical maps and approach charts, are always available for offline use.
appears in the Data downloads dock indicating that the download activity is finished and the map for your route is available for offline use. Airspaces, waypoints and obstacles, as well as installed third party aeronautical maps and approach charts, are always available for offline use.
Via the Moving Map#
Tap on a waypoint or long-press any point on the Moving Map
In the popover, tap + Add to route
Repeat these steps to add all waypoints needed for your route
It is possible to add a waypoint multiple times to a route. To add a waypoint again, simply tap on the waypoint and select + Add to route once more. To replace an existing waypoint, drag it to another waypoint or a desired location on the map. Dragging the route line will insert a new waypoint into the route.

Waypoints in your route that are not part of the aeronautical database are considered temporary waypoints. You can create a User Waypoints from them by tapping on the waypoint and selecting Create a user waypoint in the popover. You can then edit their details as needed.
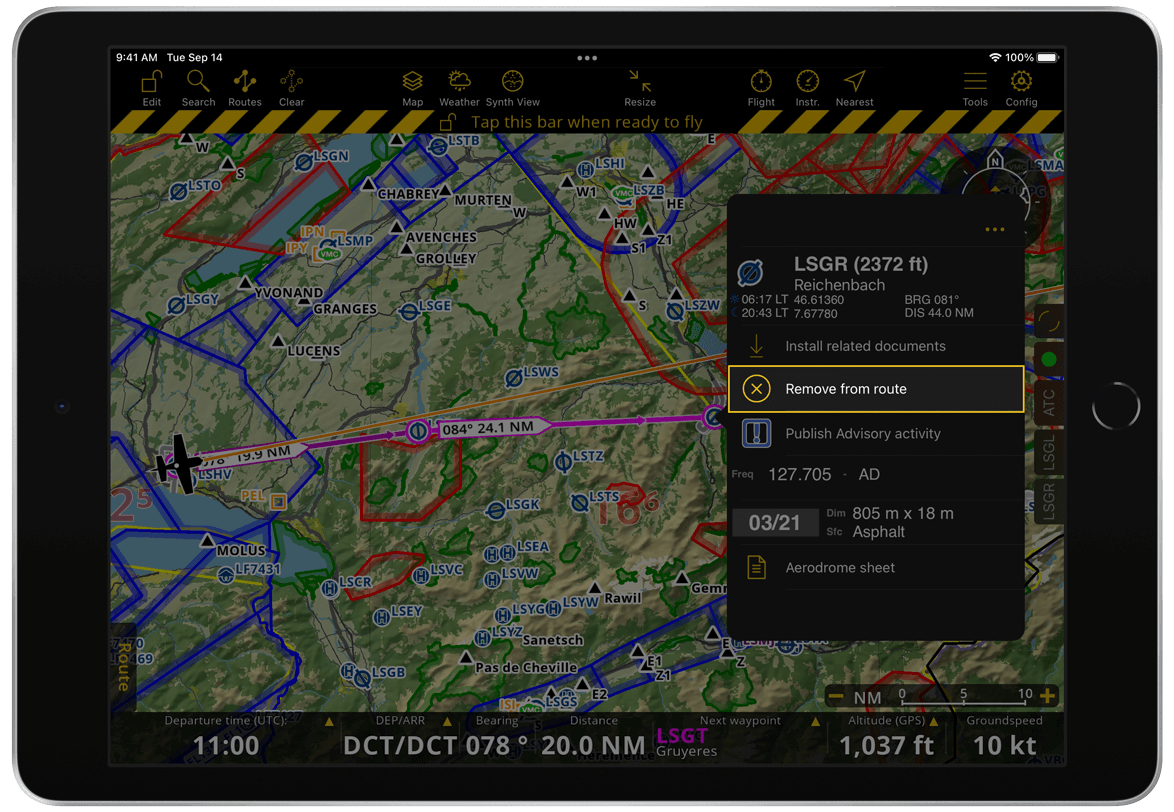
To delete an existing waypoint, tap on it and in the popover, tap Remove from route.
To start over, tap the ![]() icon in the Tablet Menu Bar. On phones, it is located inside the Map Menu.
icon in the Tablet Menu Bar. On phones, it is located inside the Map Menu.
Note
Clearing a route does not delete the route from your Routes History. To manage your routes, check out Route Management.
Direct-to Route#
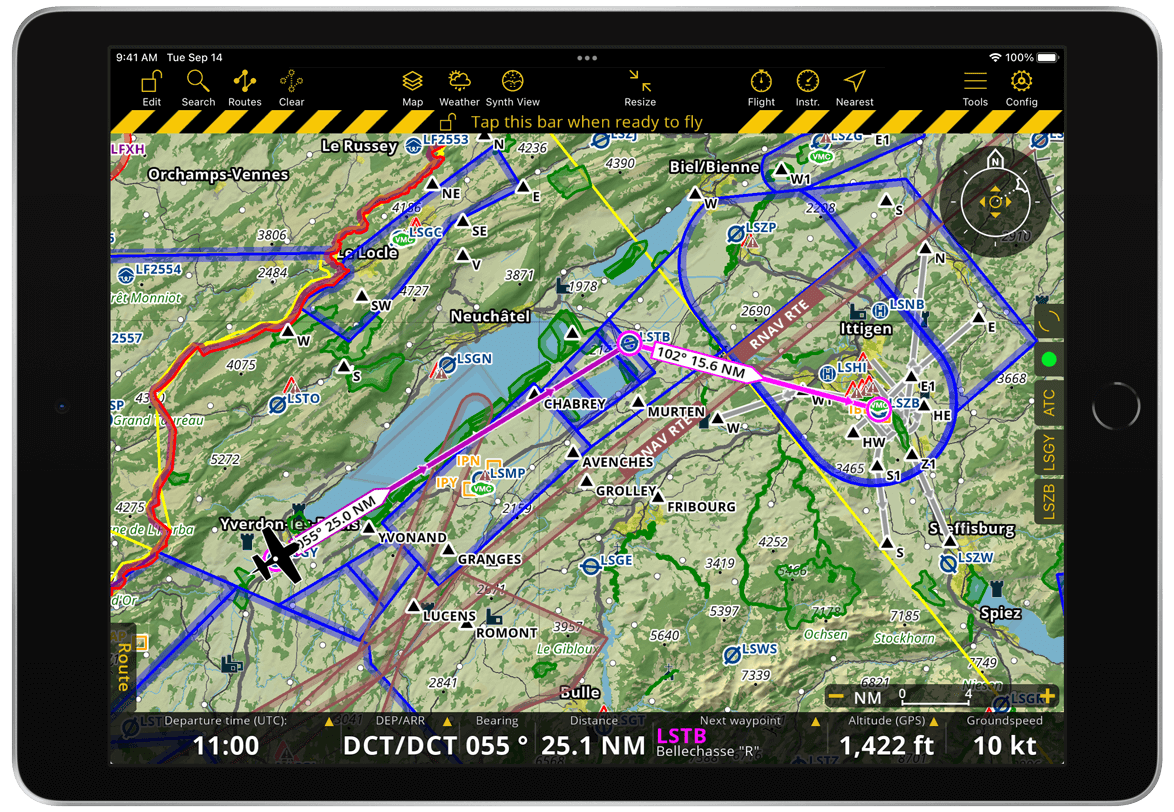
Quickly create a direct route from your current GPS position to any waypoint on the map:
Tap your destination waypoint
In the popover, tap the
 at the top right to access more options
Select Direct to
Tip
This method is a good starting point when you are already at the airport from which you plan to take off. Begin by setting your destination as direct-to, then drag the route line to adjust for obstacles, terrain, specific airspaces and other factors as needed.
Nearest Route#
In case of emergency, the app can create a direct route from your current GPS position to the nearest airport:
In the Tablet Menu Bar, tap the
 icon. On phones, it’s located inside the Map Menu.
When prompted to replace your current route with the new direct to route tap OK
Note
The Direct-to and Nearest features also work in Flight Mode.
Via the Navigation Dashboard#
Open the Navigation Dashboard by tapping the
 icon in the Tablet Menu Bar or using the Route shortcut. On phones, tap the
  icon in the mobile menu bar.
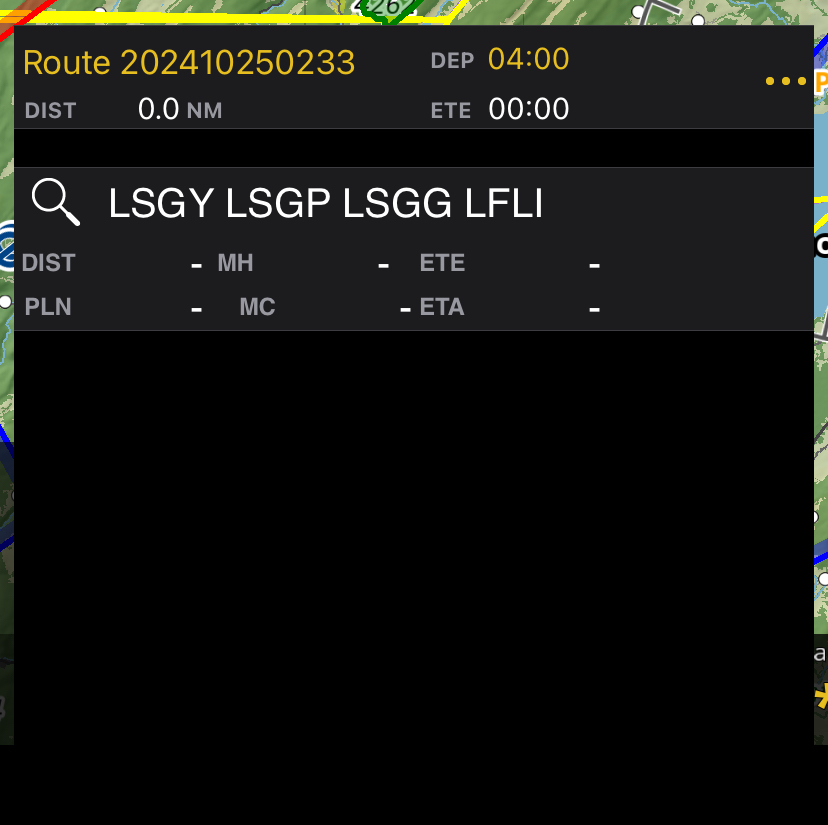
Tap + Add a waypoint
Enter the name or identifier of a waypoint
Press Enter on the keyboard
Repeat steps 2-4 to add all required waypoints

The app recognizes not only ICAO airport codes, but also the name or identifier of any waypoint type, including reporting points and User Waypoints.
Tip
If you input multiple waypoints in sequence, separated by a space, the app will automatically generate the entire route.
You can rearrange the order of waypoints by dragging the ![]() icon up or down to your preferred position.
icon up or down to your preferred position.
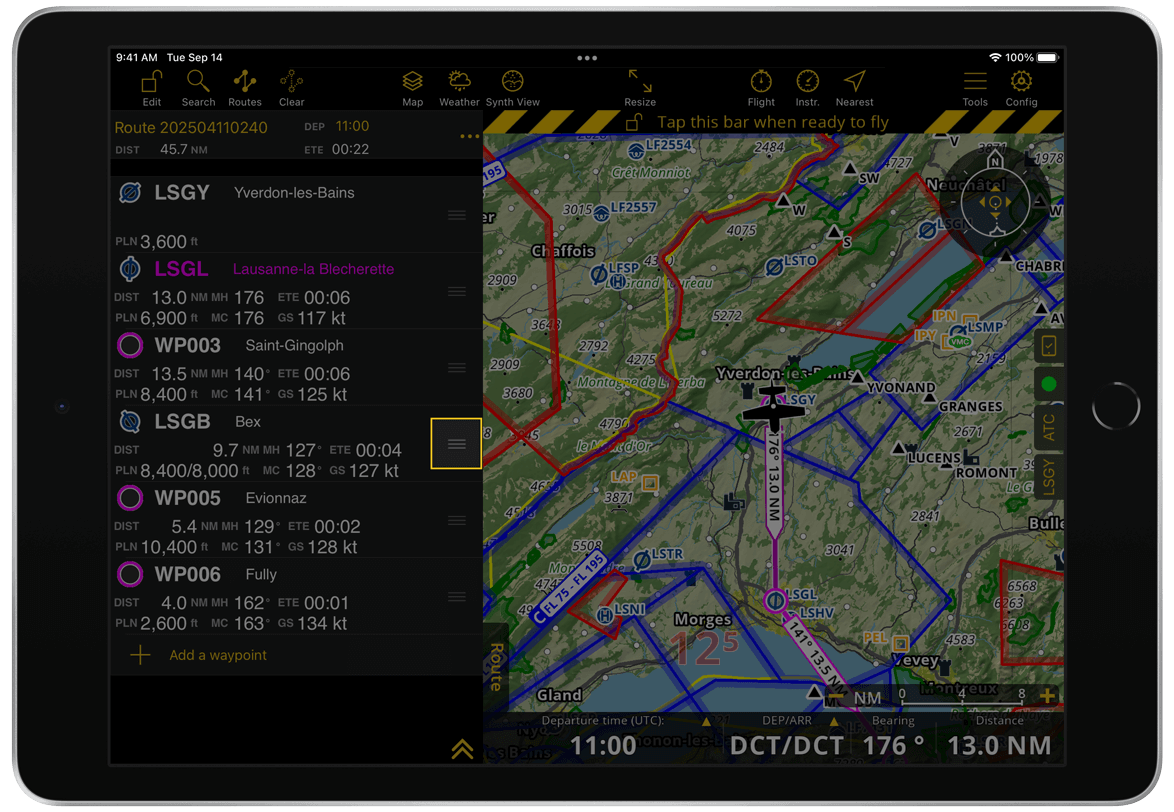
To remove a waypoint from the route, tap it and then tap the ![]() icon in the waypoint popover.
icon in the waypoint popover.
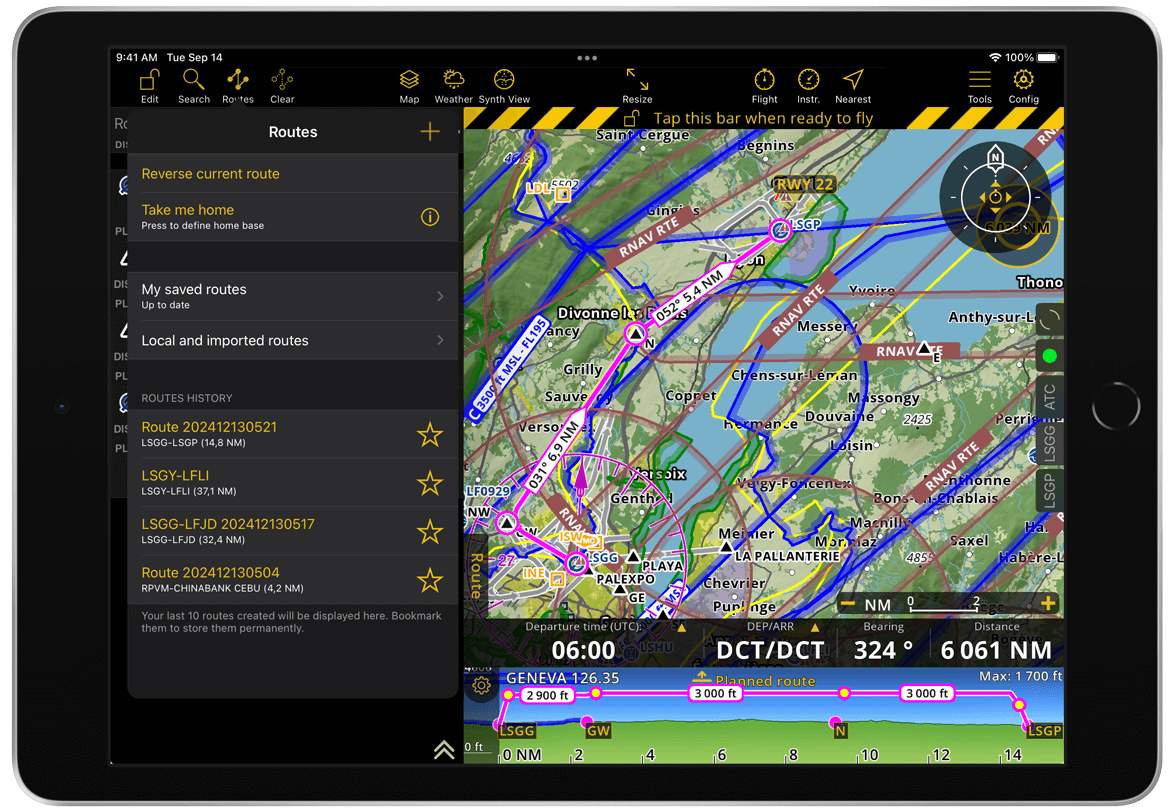
Inside the ![]() menu at the upper right corner, you can reverse a route if you want to fly it back by tapping Reverse current route. If you want different versions of the same route, duplicating the route is also possible by tapping Duplicate. You can view the duplicated route in the Routes Menu > Routes History.
menu at the upper right corner, you can reverse a route if you want to fly it back by tapping Reverse current route. If you want different versions of the same route, duplicating the route is also possible by tapping Duplicate. You can view the duplicated route in the Routes Menu > Routes History.
Route Setup#
Once you have determined your flight path, you can finish setting up your route by defining parameters such as its name, departure time, vertical navigation, arrival and departure procedures, and more.
Route’s Name#
The default name for your route is generated based on the current date and time, but you can modify it to match your preferences:
Open the Navigation Dashboard by tapping the
icon in the Tablet Menu Bar or by using the Route shortcut. On phones, tap the icon in the mobile menu bar.At the top of your route, tap the yellow default name Route <timestamp>, e.g. Route 202503180822
In the small pop-up window, clear the default name and enter your preferred name
Tap OK to save your changes
Departure Time#
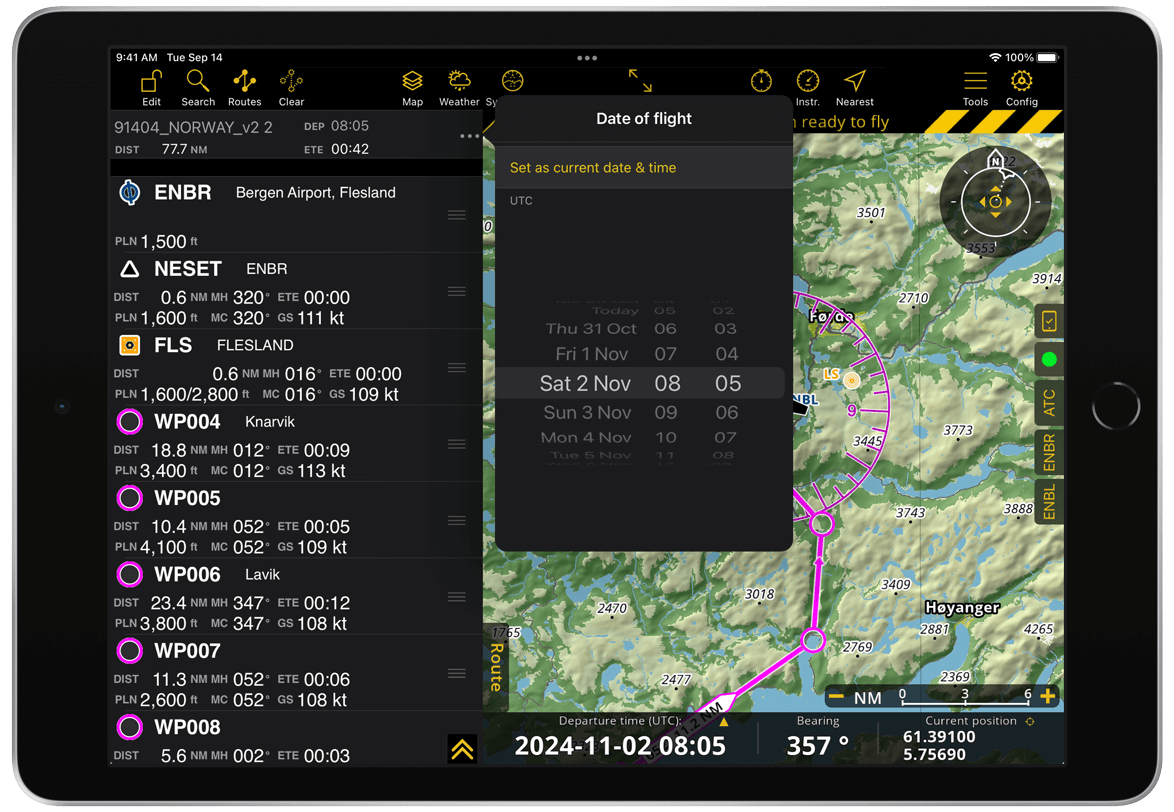
By default, the departure for your route is set to the next hour, but you can plan your flight in advance by selecting a future date and time. While in Edit Mode, the Moving Map will always display the wind forecast, NOTAM and active airspaces for your selected departure time.
In Edit Mode, a new interactive field Departure time (UTC) appears as the first item in the Navigation Bar. This special field cannot be replaced and is not included in the list of available values for the Navbar. Tap it to choose your preferred date and UTC time in the popover. You can also tap Set to now to reset the departure to the current date and time.
Alternatively, you can set the departure time via the Navigation Dashboard:
Open the Navigation Dashboard by tapping the
icon in the Tablet Menu Bar or via the Route shortcut. On phones, tap the icon on the mobile menu bar.Tap the yellow departure time
Choose your preferred date and UTC time in the popover
Landing Instruction#
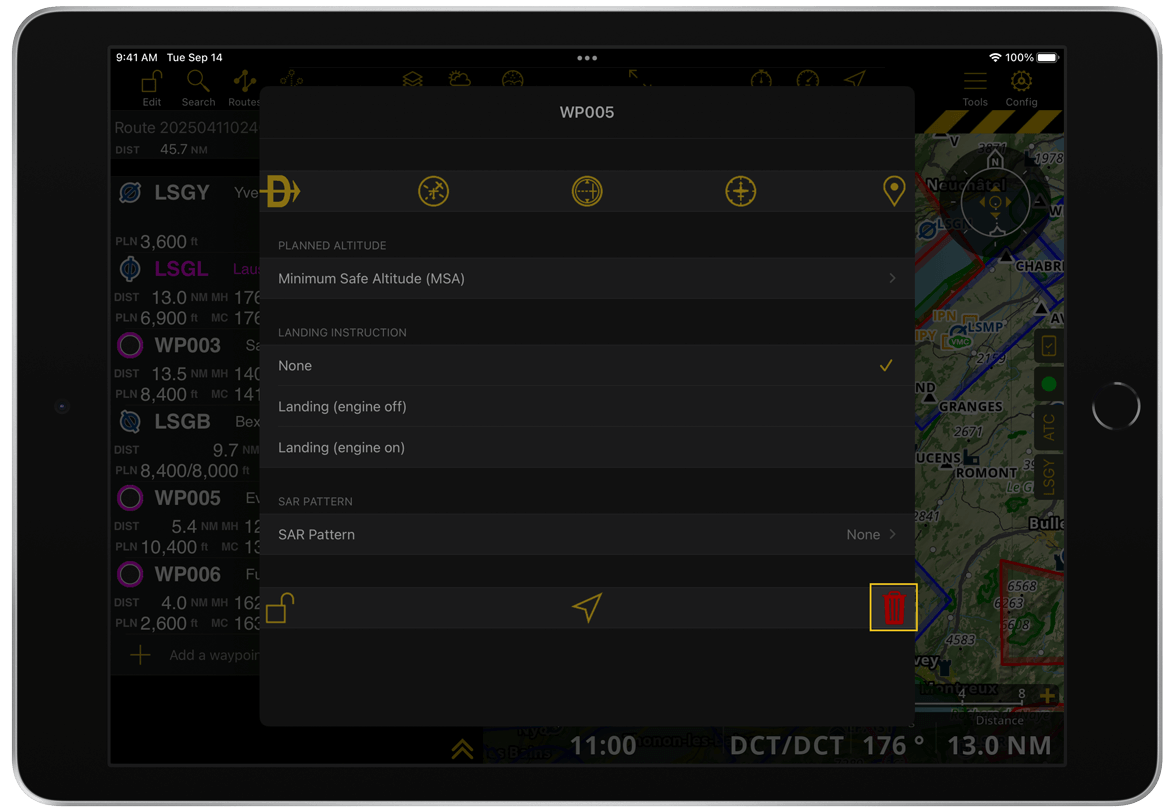
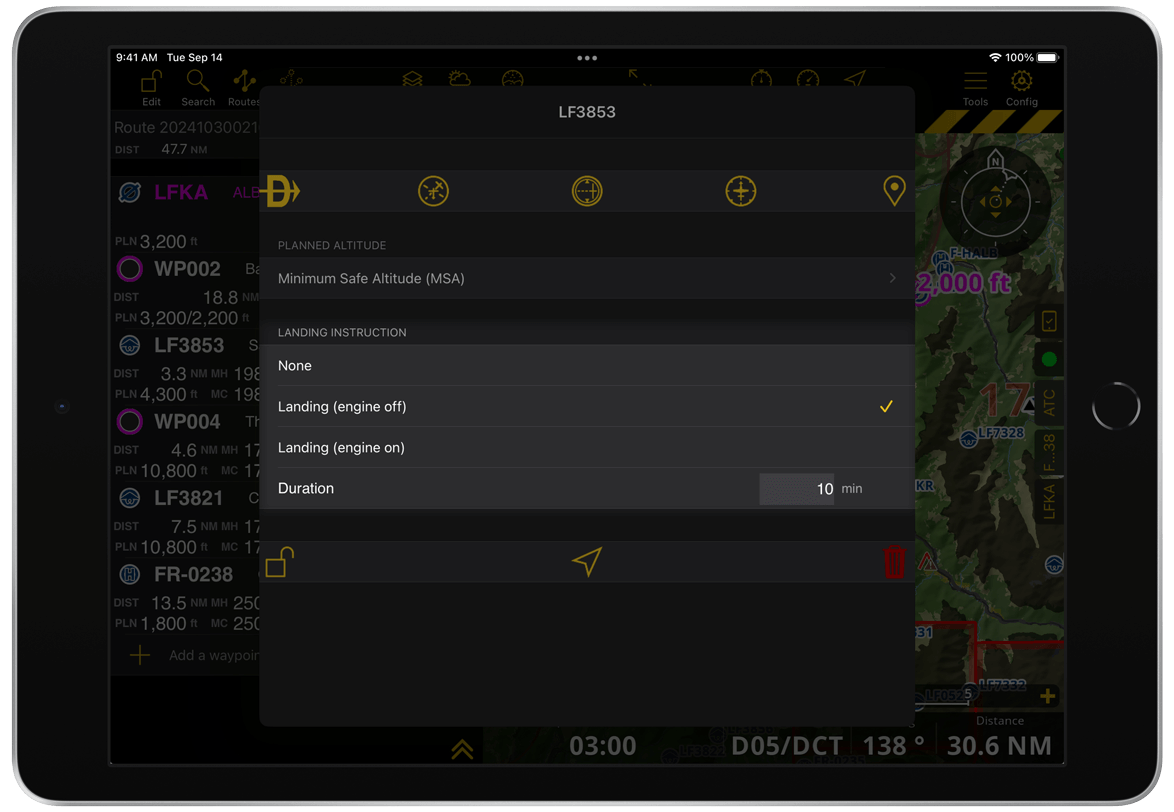
At each of your intermediate waypoints, you have the option to add a landing. Tap the waypoint in the Moving Map and select Instructions, or tap it from the Navigation Dashboard. You can specify whether you plan to keep the engine running or shut it down during your stop. If you select a landing instruction, a new field will appear where you can enter the duration of your stay in minutes.
SAR Pattern#
Air Navigation Pro supports search and rescue missions by providing the option to add search patterns to your route. To do this, your route must have at least two legs, as SAR patterns can only be added at intermediate waypoints. Additionally, ensure you are still in Edit Mode to access this feature.
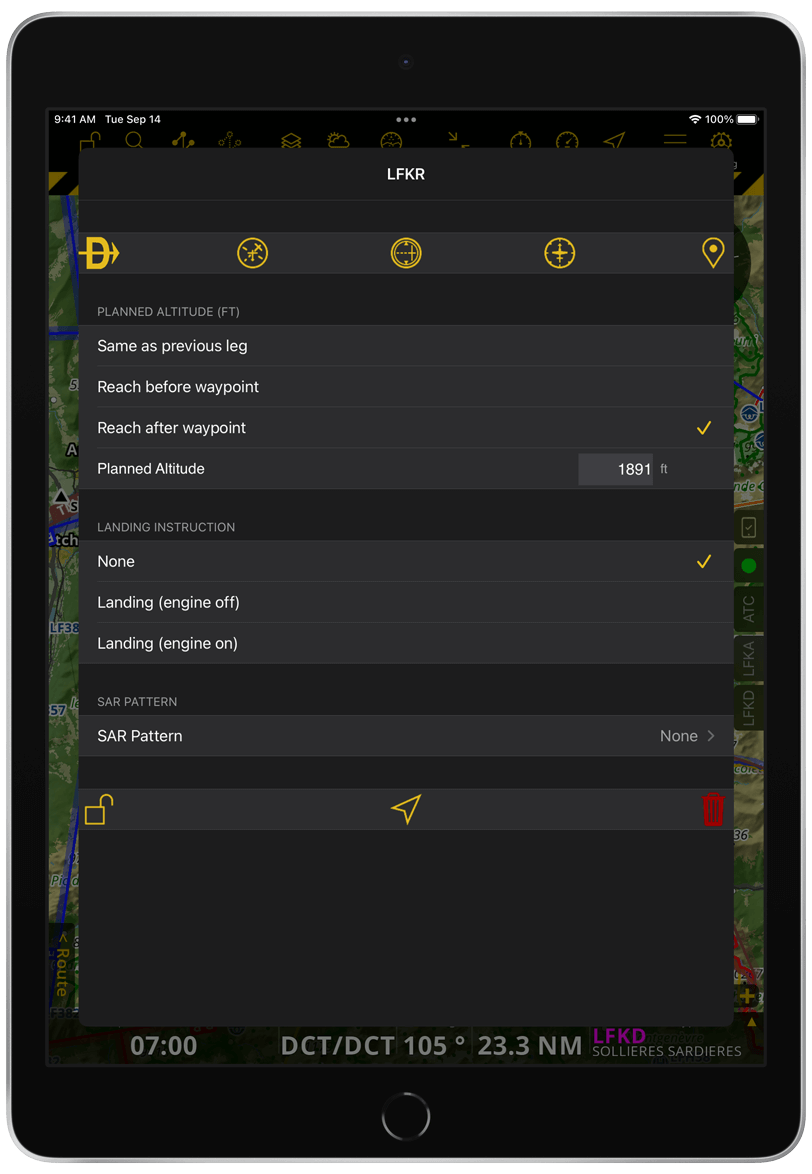
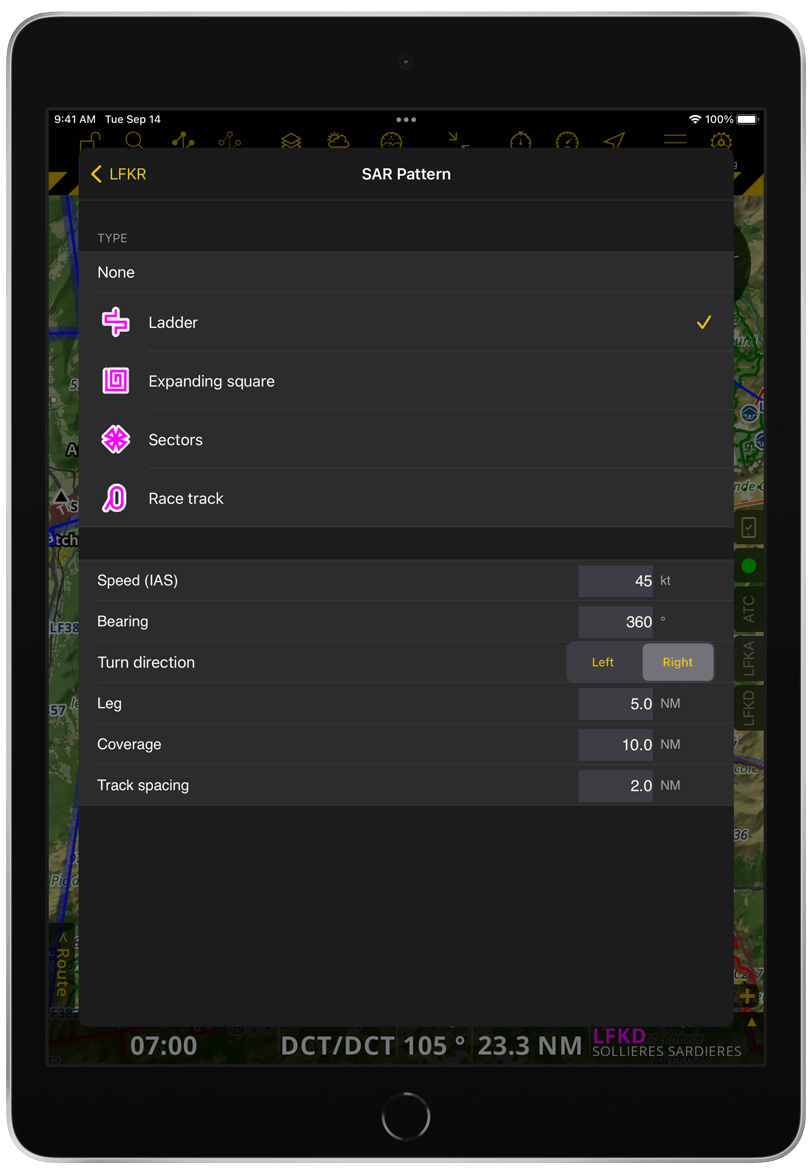
Tap the intermediate waypoint on the Moving Map where you want to add the SAR pattern, then tap Instructions to open the waypoint pop-up window. Alternatively, you can tap the waypoint from the Navigation Dashboard to access the same pop-up. From there, tap SAR Pattern and choose a search pattern type from the available options.

Once you have selected a SAR Pattern type, it is immediately displayed at your intermediate waypoint on the Moving Map. In the pop-up window, a list of parameters will appear, allowing you to adjust the pattern. If you close the window, you can easily reopen it by long-pressing the pattern. Additionally, you can modify the pattern directly on the Moving Map by dragging it.
Accepted Parameter Values#
Speed: 10kt to 250kt
Bearing: 0 to 360 degrees
Leg: equal to or greater than 1
Coverage: equal to or greater than 1
Width: equal to or greater than 1
Diameter: equal to or greater than 1
Track spacing: any value
Depending on the pattern type, the parameters may vary. The length is referred to as Coverage. For sector patterns, the width is equal to the length and is called Diameter. The default units for speed and distance are knots and nautical miles, but you can change these units in Configuration > Settings.
Vertical Navigation#
By default, the altitude for all waypoints in your route is set to the Minimum Safe Altitude (MSA) to ensure terrain clearance. You can adjust altitudes for individual legs or set a different cruise altitude that applies to the entire route.
Note
You need to be in Edit Mode to be able to plan your vertical trajectory.
Altitude Per Leg#
To customize your planned altitude for specific legs of your route, simply tap on a waypoint in the Navigation Dashboard and adjust the altitude using the altitude picker.

At your intermediate waypoints, you have the option to maintain the same altitude as the previous leg or set a new altitude to be reached either before or after passing through the waypoint.
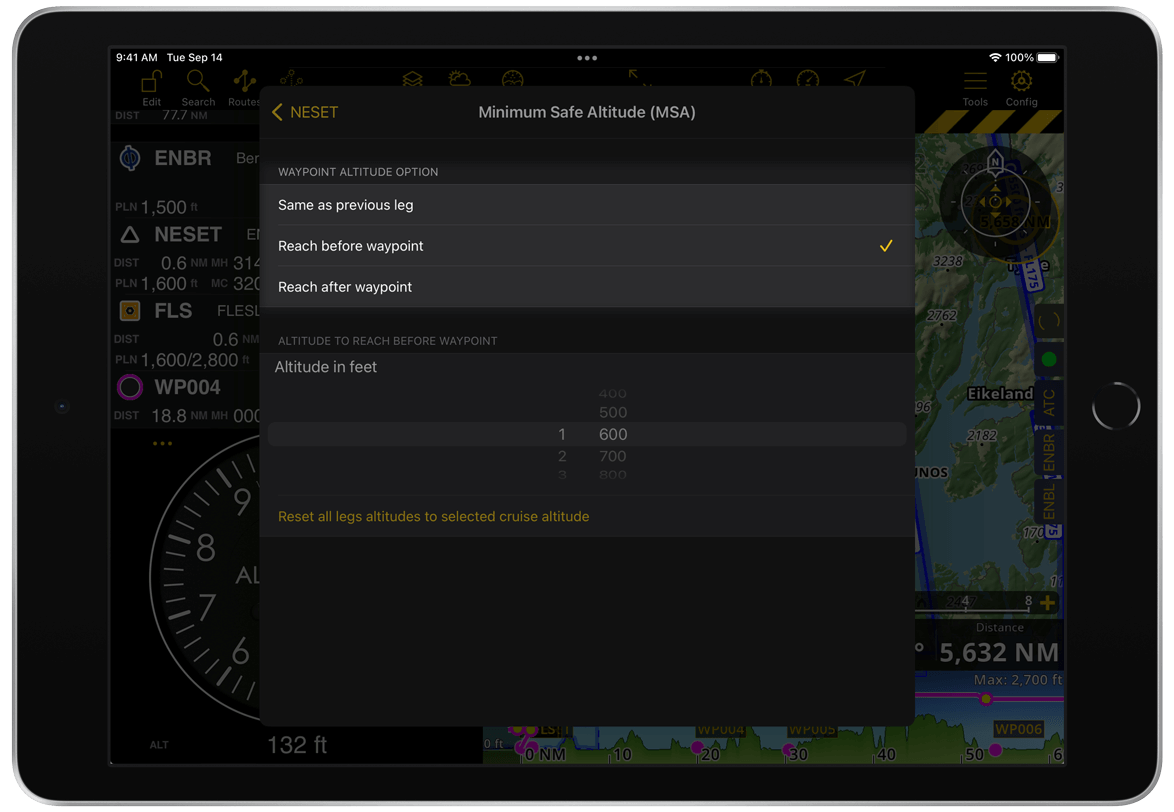
If you select Reset all legs altitudes to selected cruise altitude, all legs will be set to the Cruise altitude.
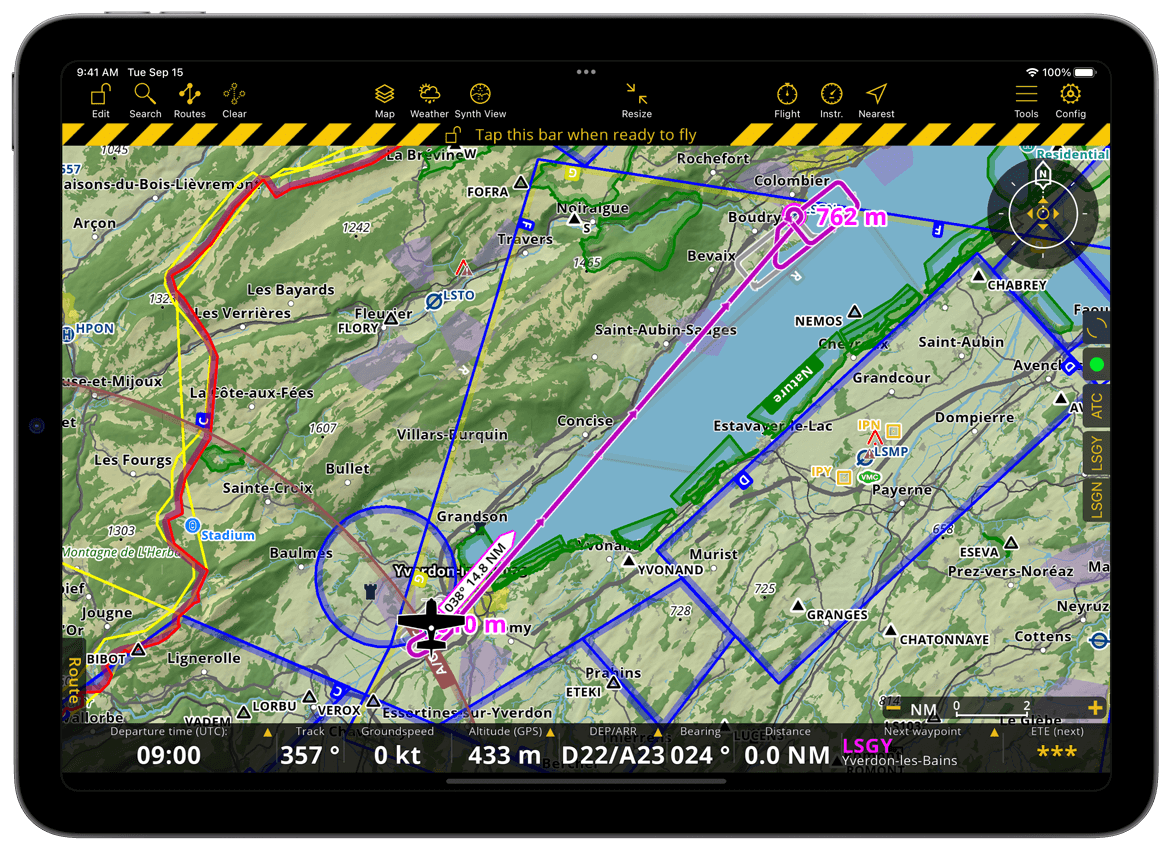
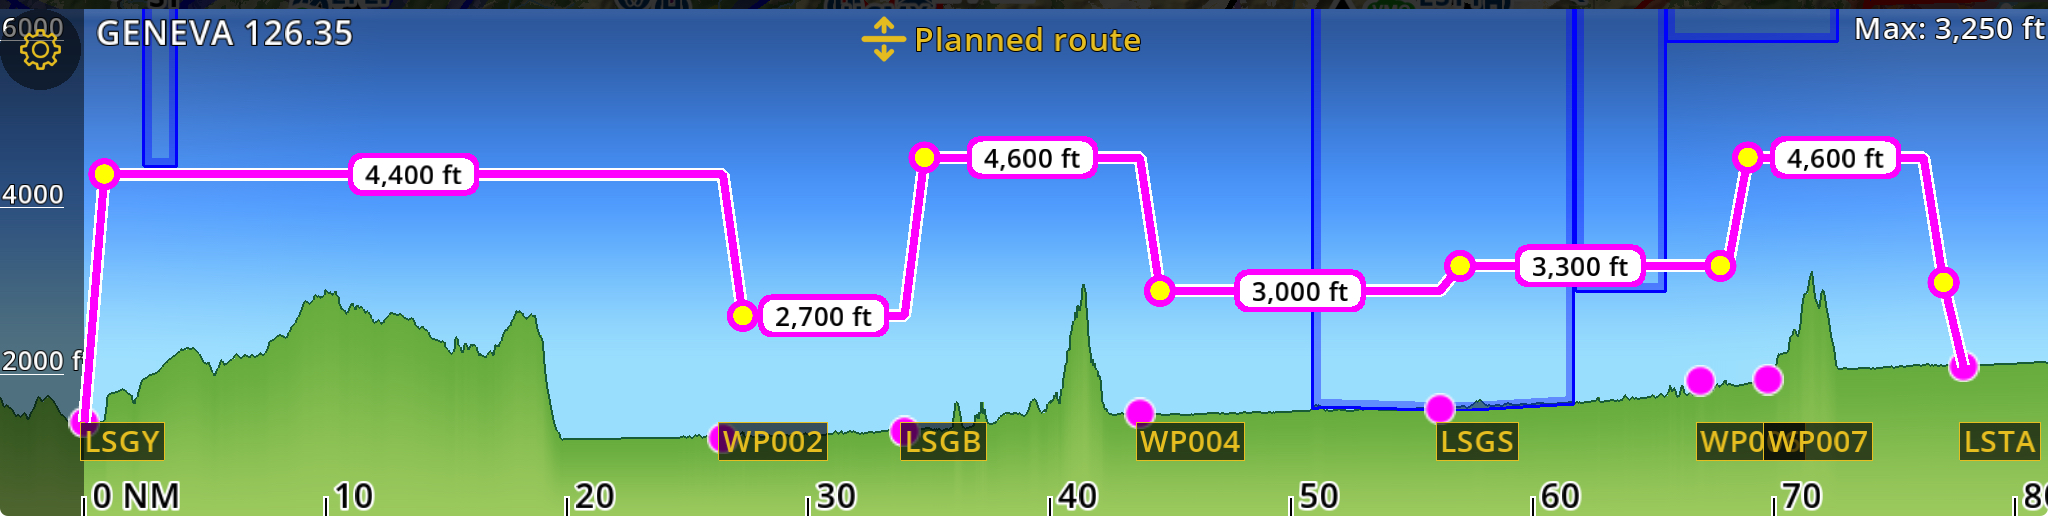
Alternatively, you can modify the altitude from the Profile View. In Edit Mode, waypoints become interactive, allowing you to adjust the altitude by dragging them up or down. Each leg has a Planned Altitude label, displaying the altitude as you make adjustments. Tapping a waypoint opens the pop-up window, where you can adjust the altitude as described above.
Cruise altitude#
Instead of adjusting each leg individually, you can define a cruise altitude, which applies to the entire route except for the arrival waypoint. If this altitude conflicts with terrain, the altitude will remain at Minimum Safe Altitude (MSA).
In the Navigation Dashboard, select the departure waypoint
Enter the Planned Altitude section
Tap Cruise Altitude
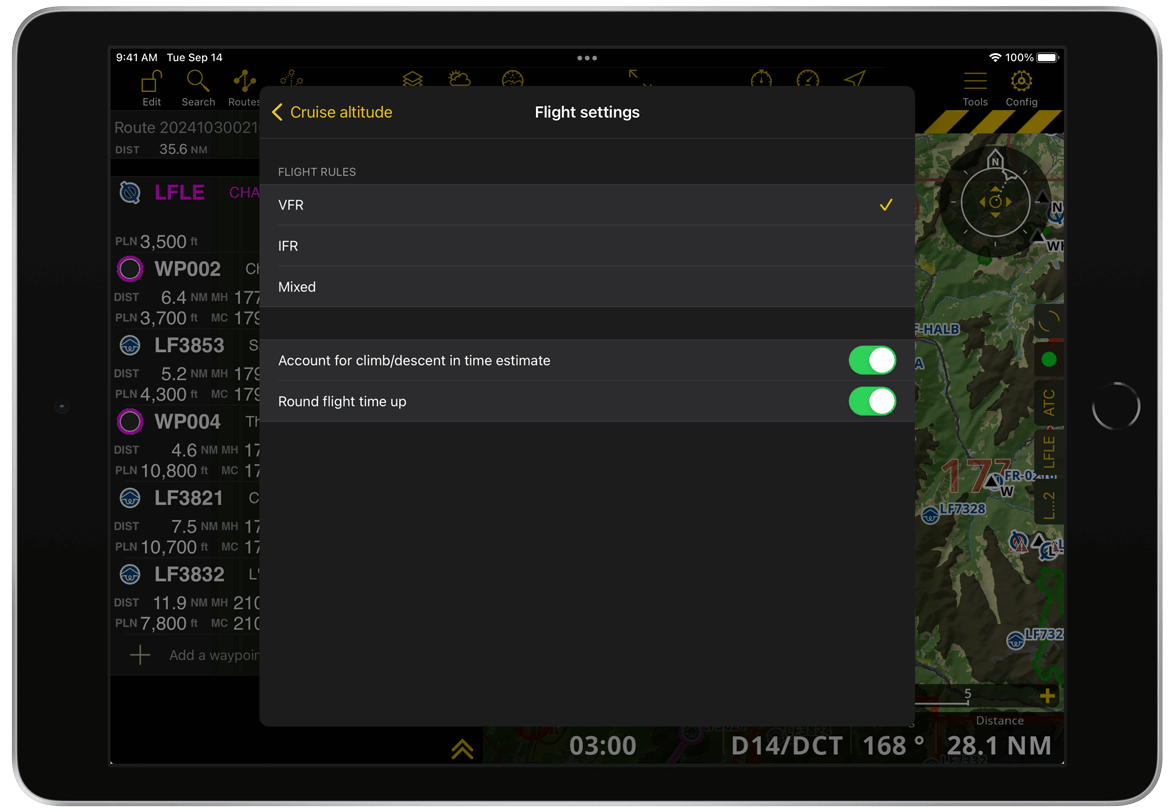
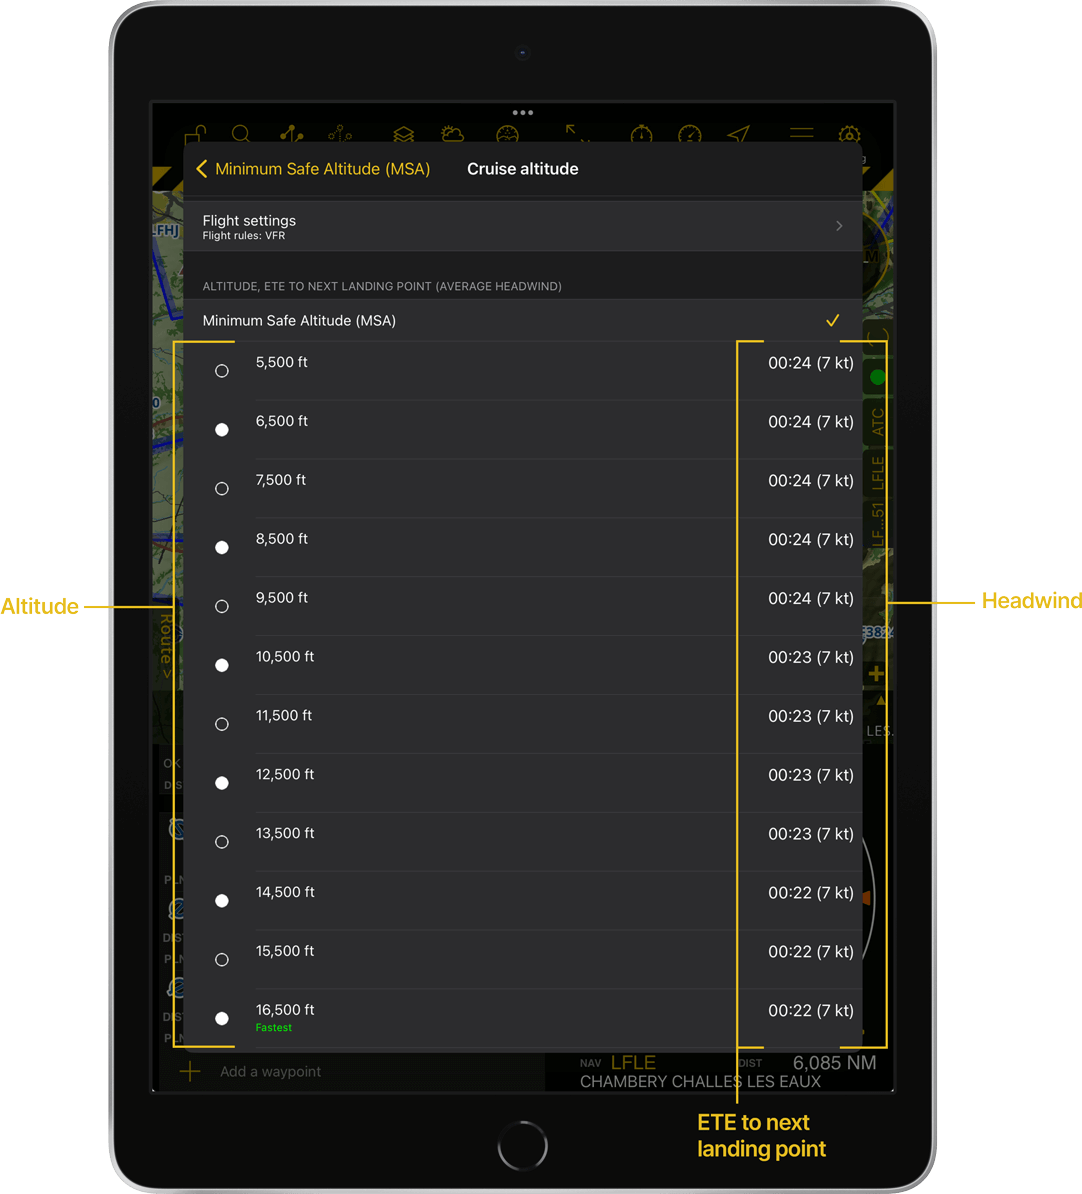
Inside the Cruise Altitude menu, you will find the Flight Settings section at the top. Tap to enter where you can configure the following options:
Flight Rules: Choose between VFR, IFR or Mixed flight rules.
Account for climb/descent in time estimate: Toggle this option ON to improve the accuracy of your estimated flight time by including climb and descent phases.
Round flight time up: Toggle this option ON to round up the estimated flight time, accounting for potential delays or adjustments.
Below the Flight Settings, you will find a list of cruise altitude options, with the Minimum Safe Altitude (MSA) set as the default at the top. Each altitude displays the Estimated Time En Route (ETE) to the next landing point and the average headwind. The fastest altitude is highlighted for easy reference, helping you choose the most efficient option for your flight.
You can also access this menu from the Profile View by tapping the first waypoint of your route.
Note
The cruise altitude is only available for the departure waypoint or an intermediate waypoint where a landing is planned (see Landing Instruction).
Set Wind#
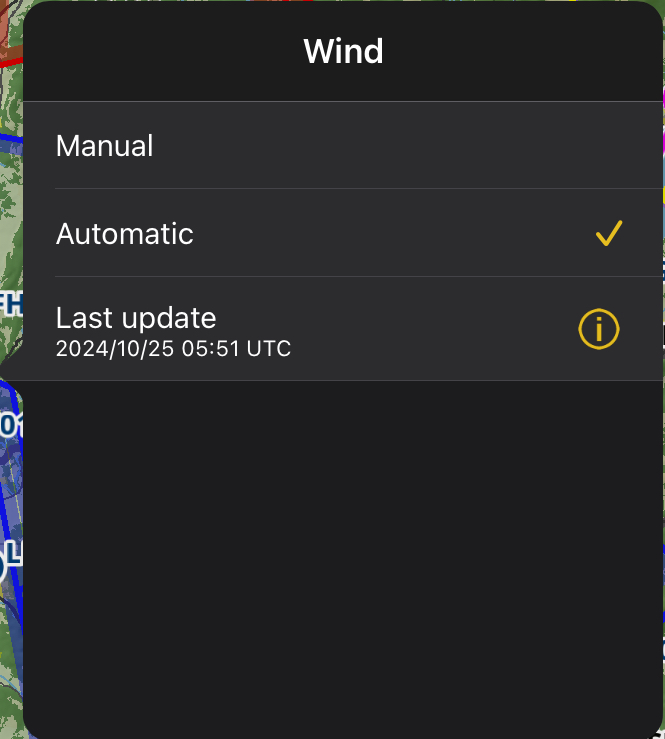
If your departure date is within the next 48 hours, Air Navigation Pro automatically fetches wind information for each leg from the internet to better estimate flight time and fuel consumption. The values are displayed when generating a Navigation log.
However, if needed, you can manually set the wind by following these steps:
Tap the
icon in the Tablet Menu Bar or the Route shortcut. On phones, tap the icon on the mobile menu bar.In the the upper right corner of the Navigation Dashboard, tap the
iconTap Set wind
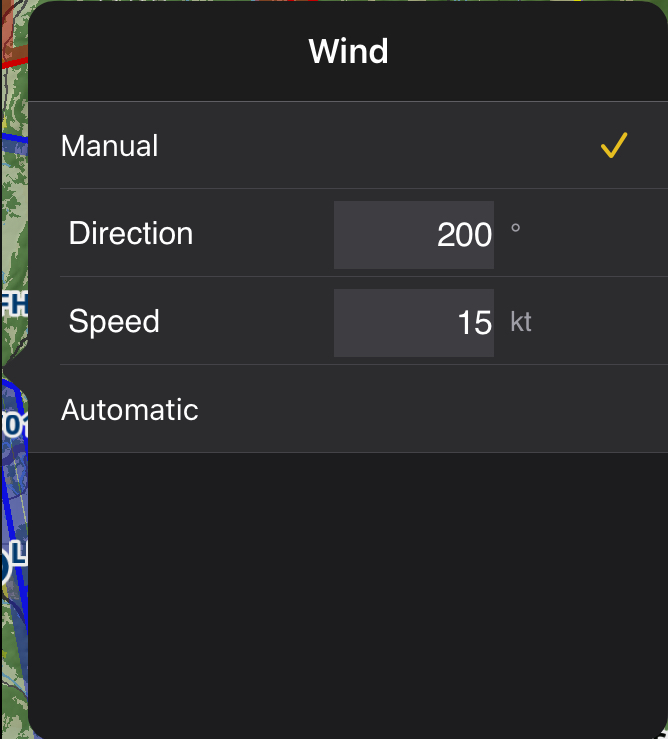
Select Manual
Enter the wind direction and speed for your route
Install related documents#
After creating a route, when switching to Flight Mode, you will be prompted to install all documents related to your route from the products you own. Alternatively, you can download them from the Navigation Dashboard by following these steps:
Tap the
icon in the Tablet Menu Bar or the Route shortcut. On phones, tap the icon on the mobile menu bar.Tap
at the upper right cornerTap Install related documents
After installing all route related documents, the option will disappear from the ![]() menu.
menu.
Note
This option is only available when you include waypoints in the route that have approach charts and if you are subscribed to the approach charts needed for your route. Also, an internet connection is required.
ATC Flight Plan#
If you need to present an ATC Flight Plan for your route, you can access the Briefing feature directly from the Navigation Dashboard by tapping the ![]() icon at the upper right corner and then selecting ATC Flight Plan.
icon at the upper right corner and then selecting ATC Flight Plan.
For detailed instructions on how to complete an ATC Flight Plan, refer to the ATC Flight Plan section on the Briefing page.
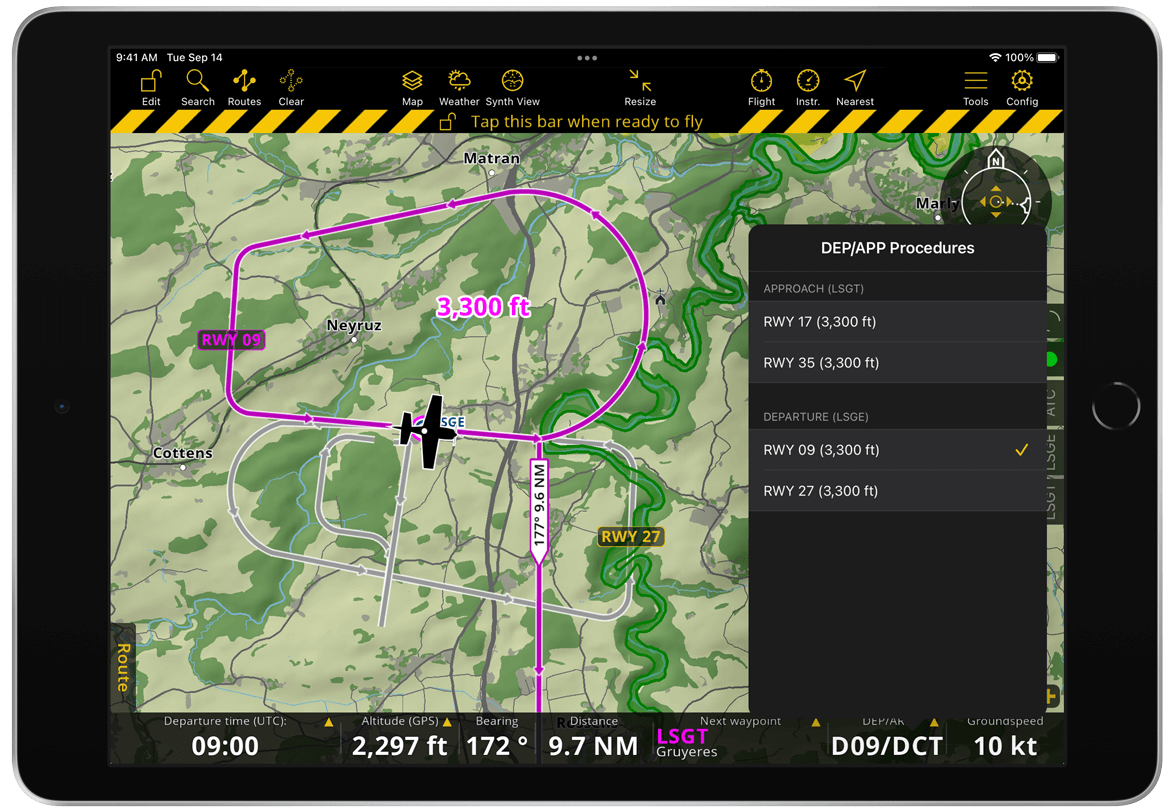
Departure and Arrival Procedures#
For supported countries, Air Navigation Pro provides dynamic flight pattern information for airfields. These procedures include animated arrows indicating departure and arrival directions, along with altitude labels.
Departure and arrival procedures are interactive if the procedure selectors are toggled ON in Map Options > Guides. Alternatively, you can add the value DEP/ARR to your Navigation Bar, allowing you to tap it and select a procedure from the popover window.
Note
These procedures can also be selected in Flight Mode, making it possible to choose an arrival procedure while approaching the airfield.
Route Management#
You can manage your routes using the Routes Menu, accessible by tapping the ![]() icon in the Tablet Menu Bar. On mobile phones, it’s inside the Map Menu.
icon in the Tablet Menu Bar. On mobile phones, it’s inside the Map Menu.
The Routes Menu organizes your routes into different folders based on their type and source:
My saved routes: contains your bookmarked routes
Organization’s Name: contains routes from your Air Navigation Manager organization
Local and imported routes: contains previously created and imported routes
Routes History: lists your last 10 created routes
Routes History#
In this section, you can view your last 10 created routes. Tap the ![]() symbol to bookmark a route. You will be prompted to enter a name for the route. You can either keep the existing name or change it. The bookmarked route will then be moved to the My saved routes folder.
symbol to bookmark a route. You will be prompted to enter a name for the route. You can either keep the existing name or change it. The bookmarked route will then be moved to the My saved routes folder.
Note
You cannot bookmark a route with no leg.
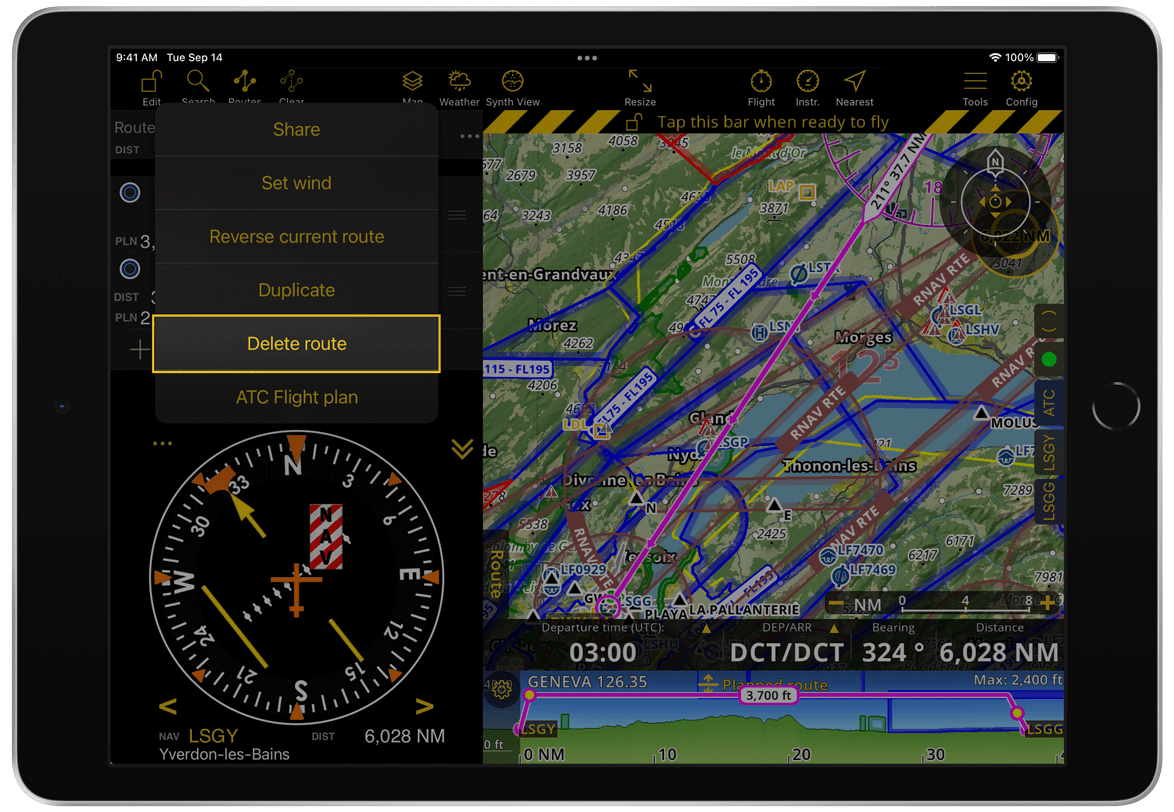
To delete a route from your history, swipe it to the left. You can also delete a route from the Navigation Dashboard by tapping the ![]() icon in the upper right corner and selecting Delete route.
icon in the upper right corner and selecting Delete route.
Note
You cannot delete a bookmarked route. If you attempt to delete one, a warning message will appear. You must first unbookmark it to be able to delete it.
My saved routes#
Air Navigation Pro allows you to save routes to your Air Navigation Account, making them automatically accessible across the three devices included in your subscription. In the My saved routes section, you can view all your bookmarked routes.
Note
If you don’t have an Air Navigation Account or you’re not logged into it, the My saved routes folder will not be visible.
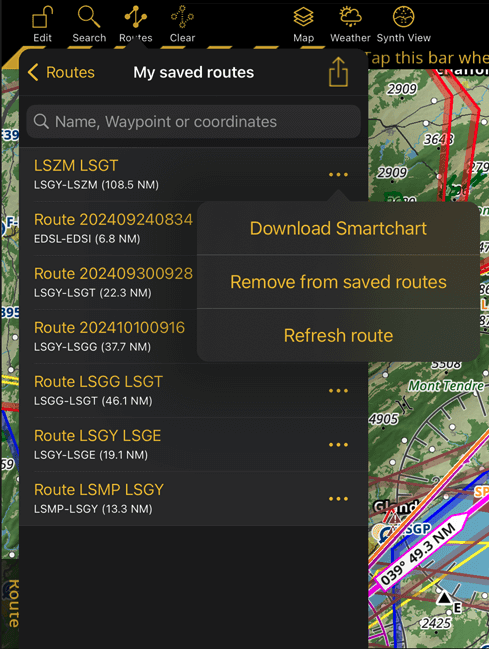
Tap the ![]() icon on any route to access the following options:
icon on any route to access the following options:
Download Smartchart: make the SmartChart around your route available for offline use. You can track the download progress in the Data downloads dock.
Remove from saved routes: unsave a route, returning it to the top of the Routes History.
Note
Saved routes cannot be swiped left for deletion as in the Routes History section. To delete a bookmarked route, you must first unbookmark it. This moves the route back to the Routes History, where you can then delete it.
Refresh route: sync the latest version of the route if it has been modified on another device
Important
After modifying a saved route, switch to Flight Mode on the device where you made the changes so your other devices can receive the update.
To export your saved routes, tap the ![]() icon in the top right corner. The route names will turn white, allowing you to select the ones you want to share. A yellow checkmark indicates the selected routes. Tap the
icon in the top right corner. The route names will turn white, allowing you to select the ones you want to share. A yellow checkmark indicates the selected routes. Tap the ![]() icon again and choose an export option.
icon again and choose an export option.
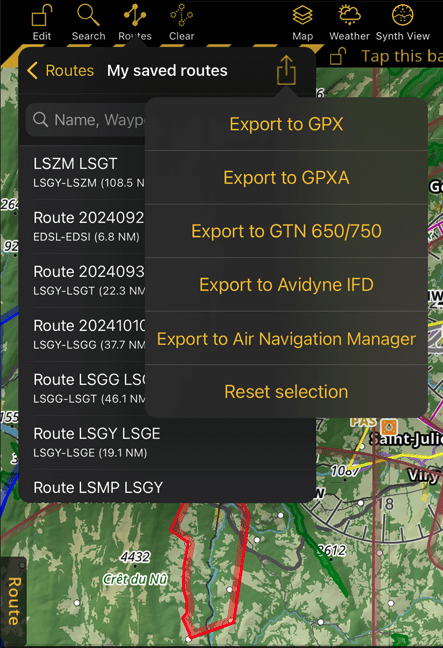
The Export to Air Navigation Manager option is only available if you are a member of an organization. If you are connected to an onboard avionics system from Dynon or Avidyne, an additional export option will appear to share the route directly with that device. Read more about Avionics connection.
You can also share your created route from the ![]() menu at the upper right corner of your Navigation Dashboard. For further instructions, see Routes.
menu at the upper right corner of your Navigation Dashboard. For further instructions, see Routes.
Local and imported routes#
When upgrading to app version 8.3.400, all existing routes on your device that haven’t been uploaded to your Air Navigation Account yet are moved to this folder. Additionally, any routes imported from a Web Server or with WebDAV are stored here. Tap ![]() on any route to bookmark it or download SmartChart.
on any route to bookmark it or download SmartChart.
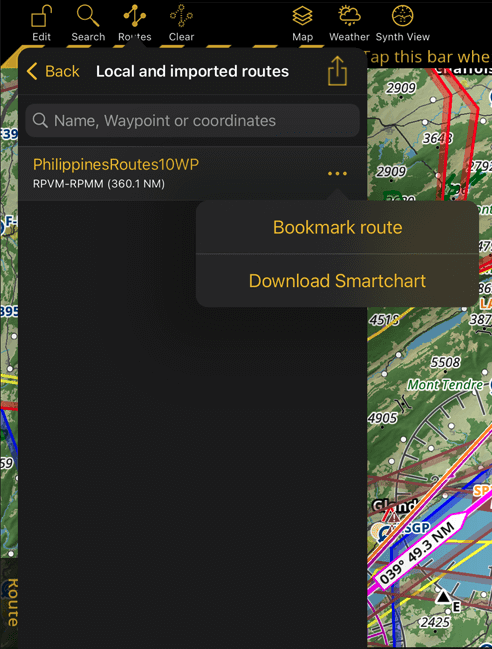
The export function works the same way as in the My saved routes folder. Routes stored here can be deleted by swiping them left.