

Map options menu#
Map Modes#
The app offers two modes to customize your map display: Visual and Satellite.
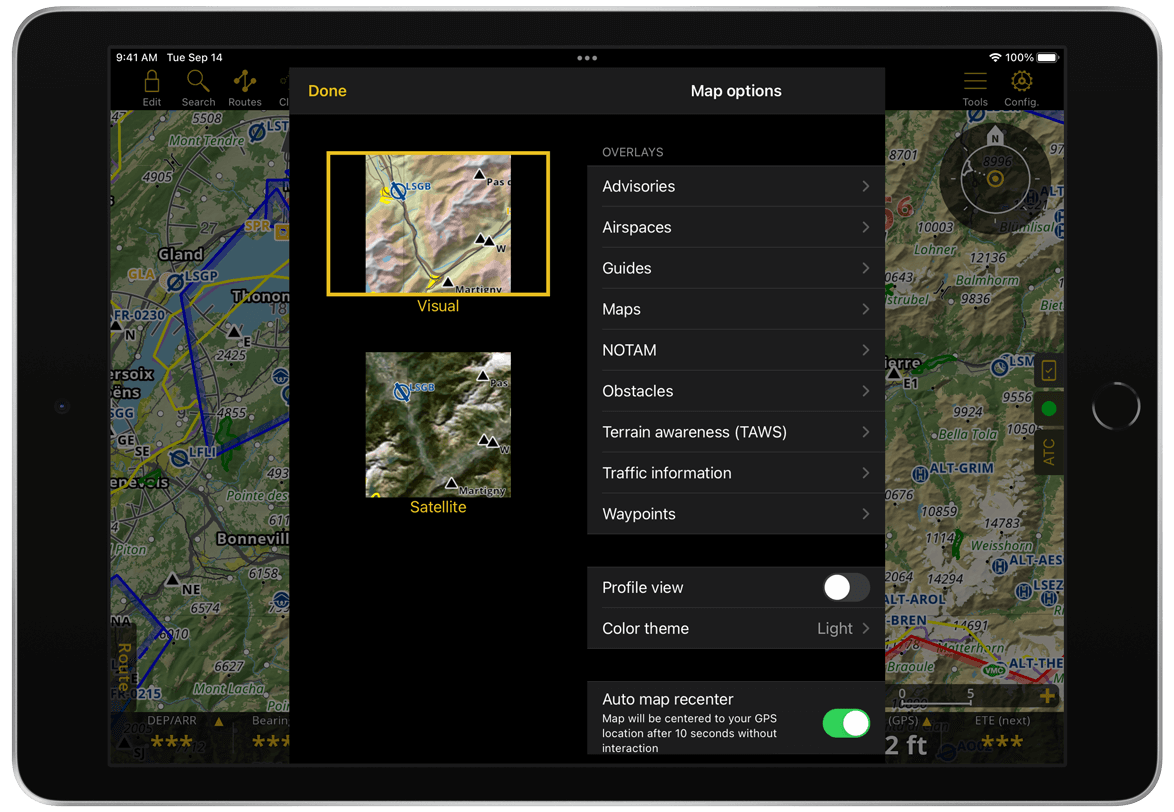
Visual#
This mode offers a clear representation of geographic features, toponyms, landmarks and routes, focusing on simplicity for easy navigation.

Read more on SmartChart.
Satellite#
This mode offers a detailed view of the Earth using satellite images, showing terrain, landmarks and geographical features in a realistic way. It helps you navigate with better awareness.
Note
This mode is only available for Smart Classic and Smart Advanced subscribers.
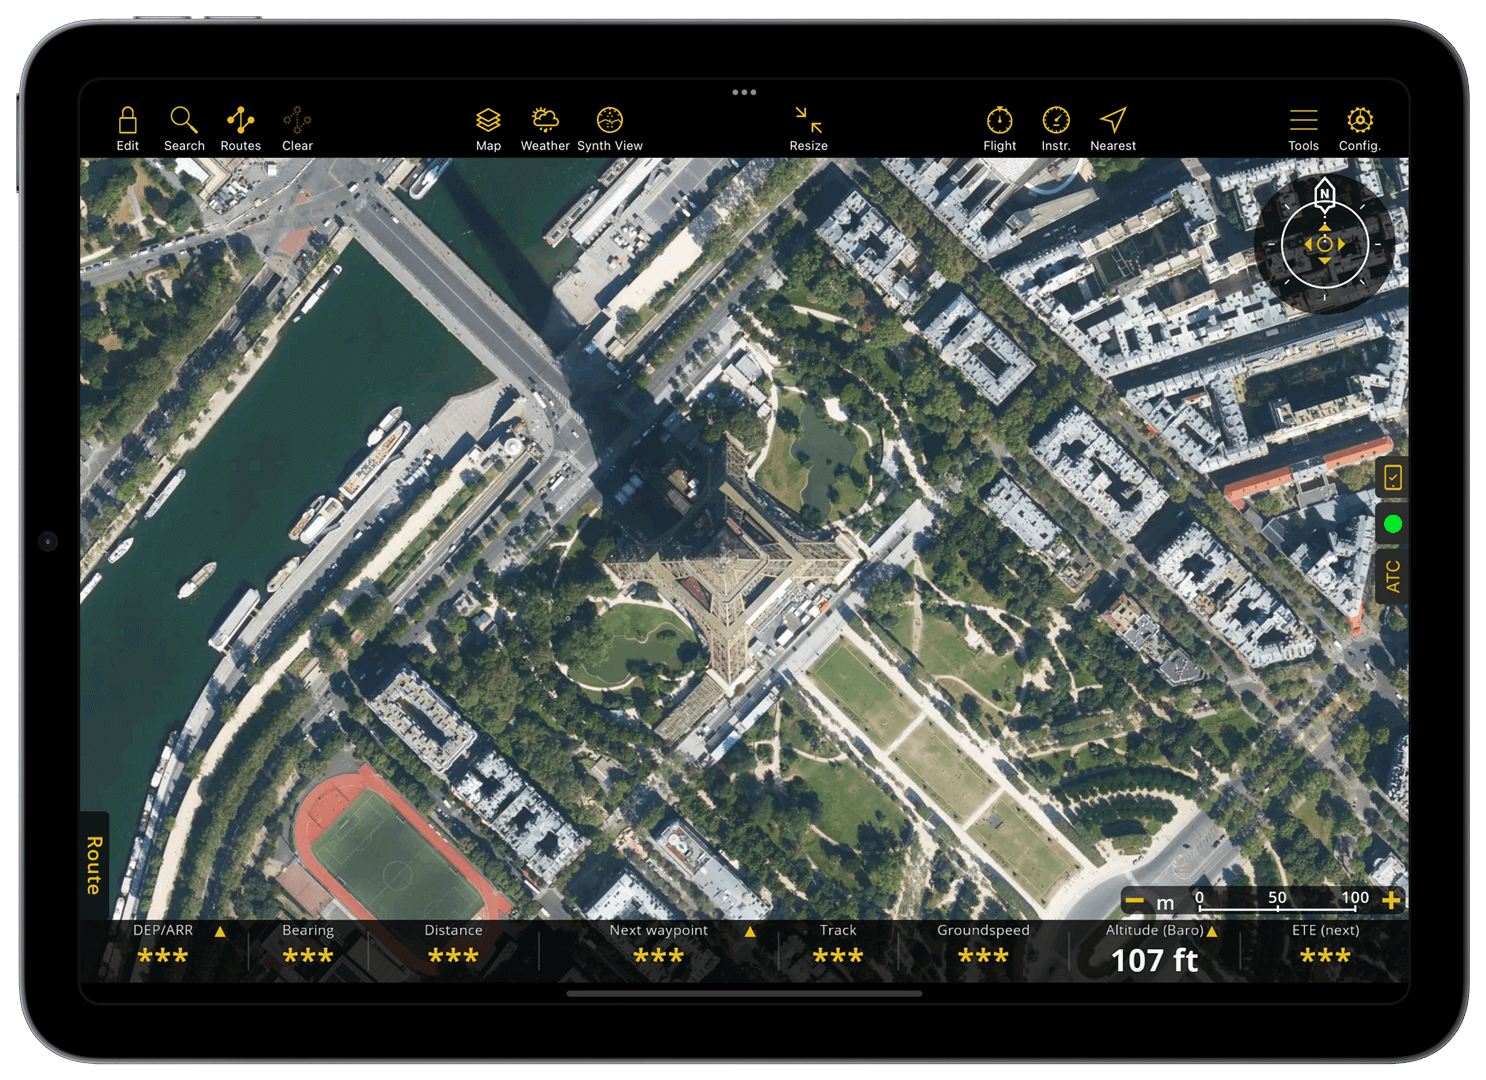
High Resolution Satellite Imagery#
You can easily zoom in on the map to access high-quality satellite images, even offline on those areas relevant to your route.
Note
This feature is only available for Smart Advanced subscribers.
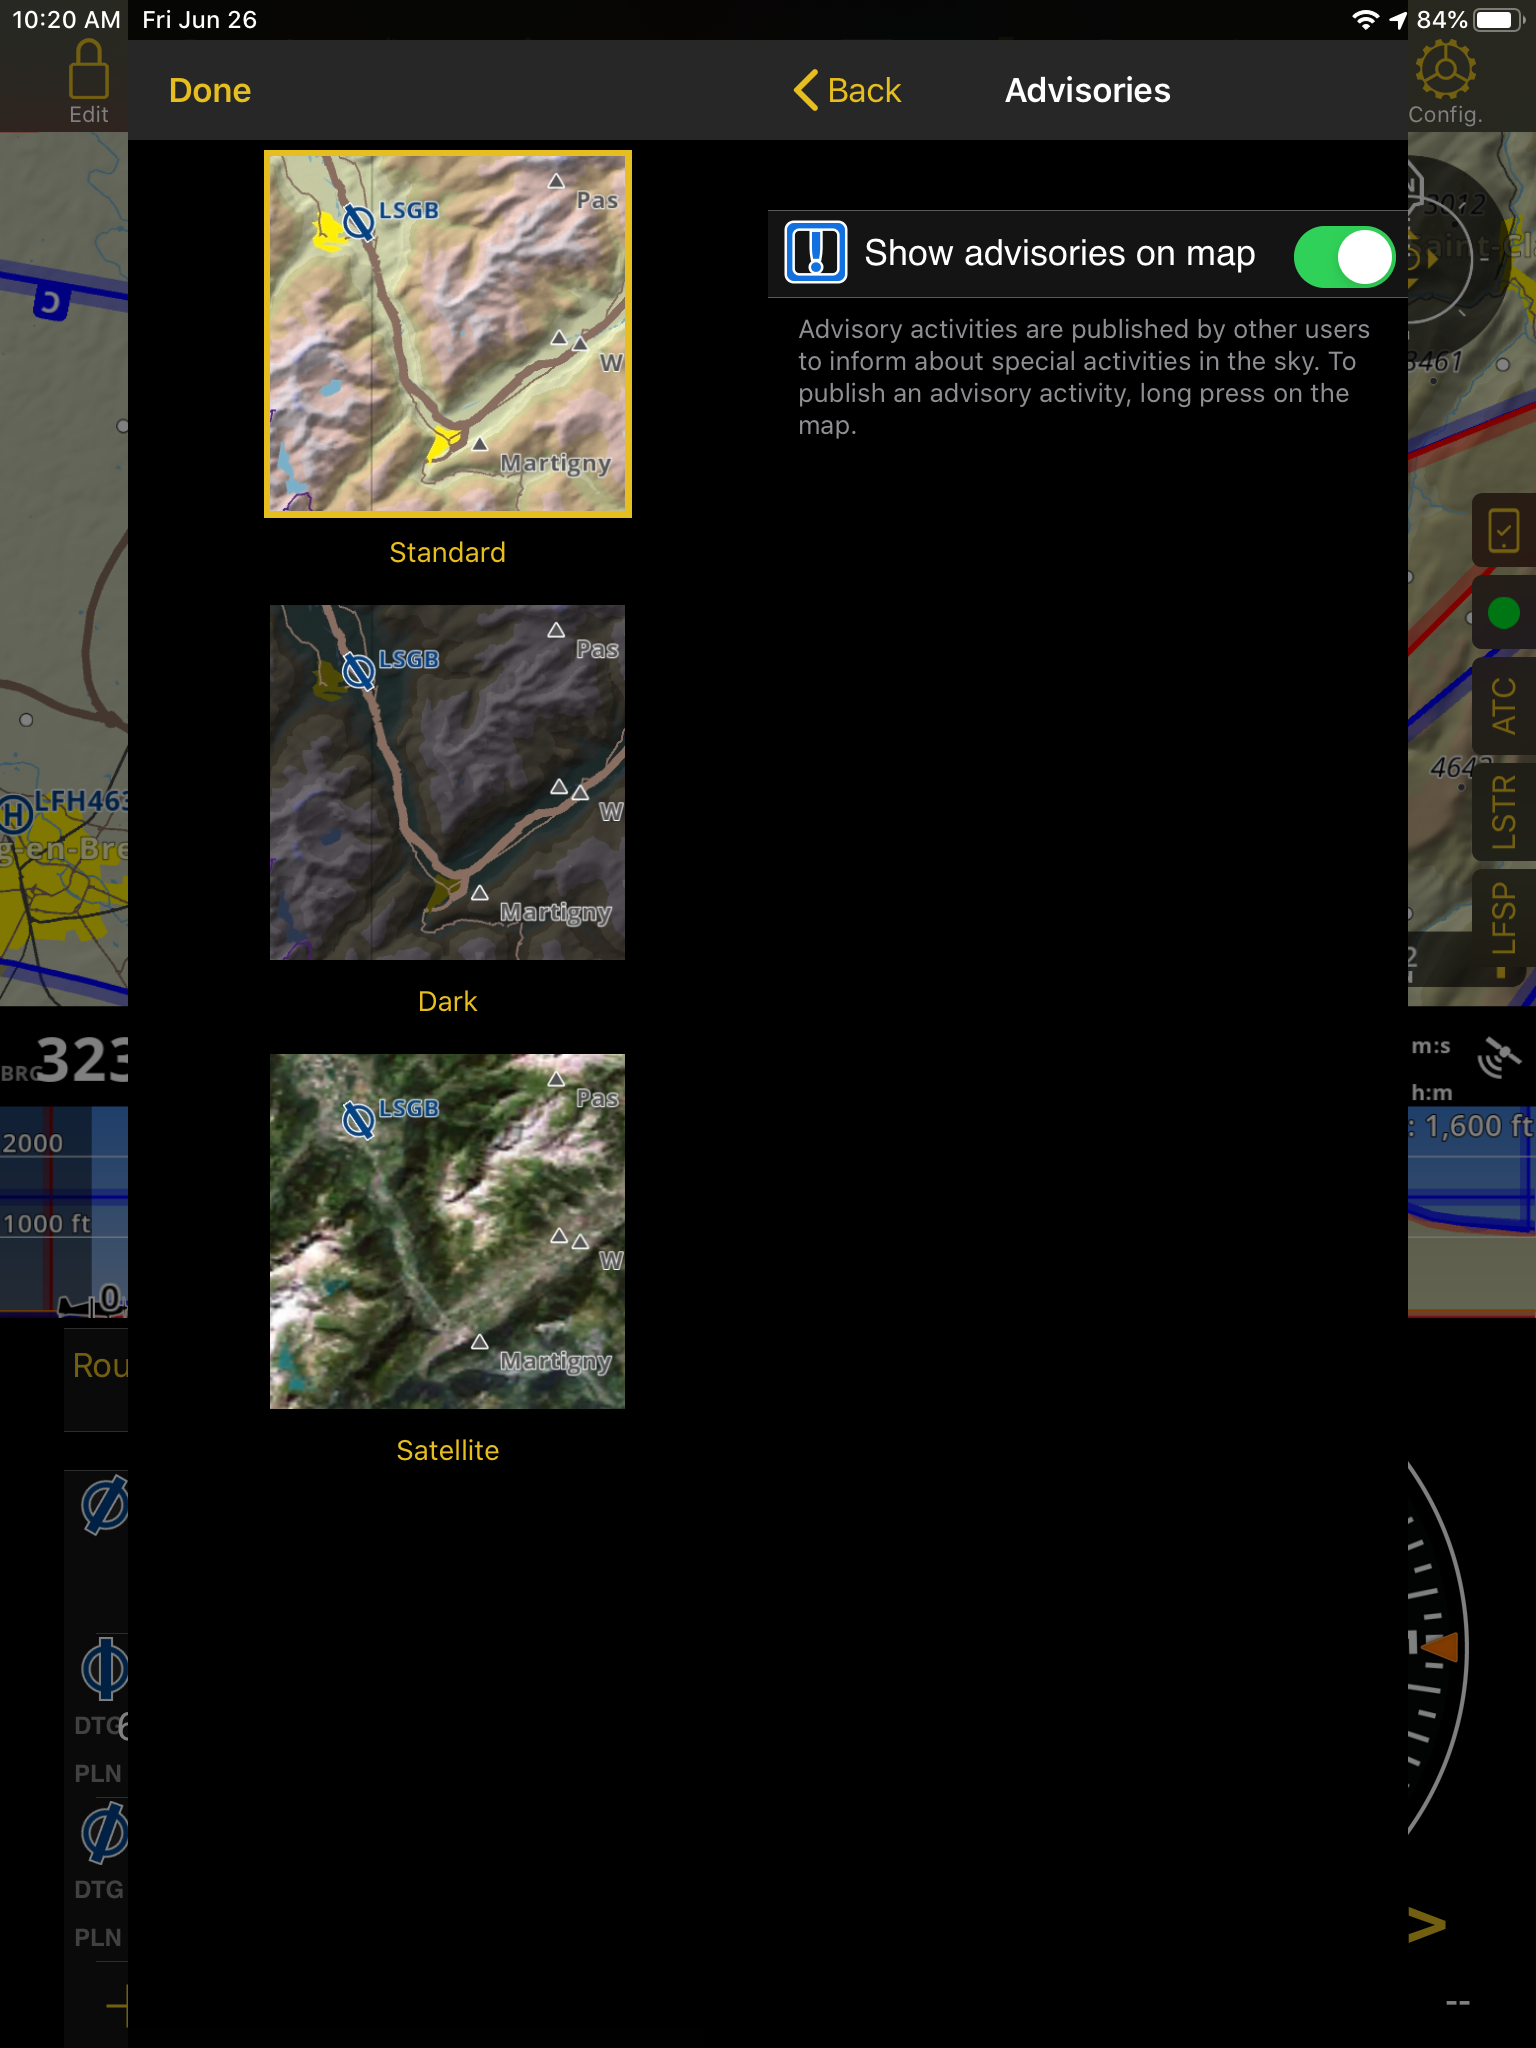
Advisories#
Choose to show/hide Advisories on the map. See Advisories for details.
Airspaces#
From this menu, you can easily manage if and how Airspaces are displayed on the Moving Map. You can verify if your aeronautical database is up to date, show or hide airspaces, filter them by altitude or class, and customize the appearance of some airspaces.
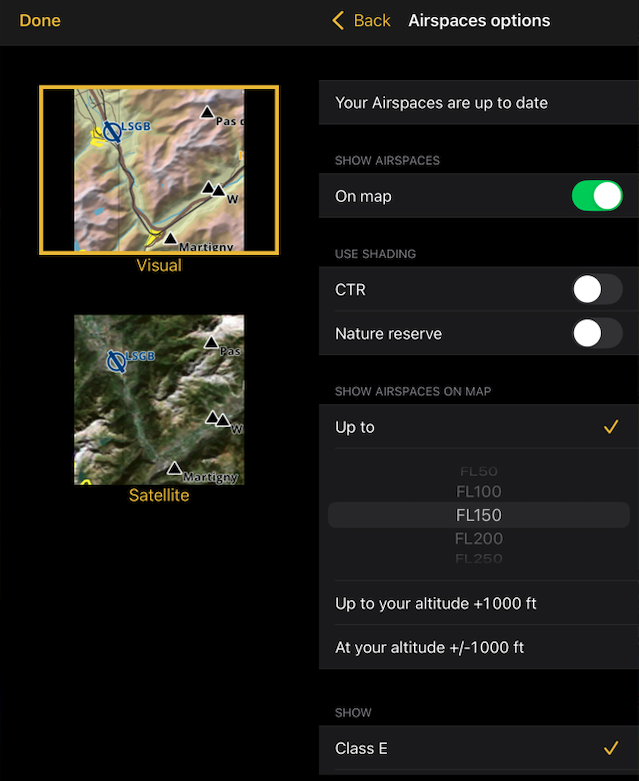
Airspaces options#
Show airspaces on map: Toggle this option ON to display them on the Moving Map and OFF to hide them.
Use shading: Toggle this option ON to add a special color shading to the inside of CTRs and nature reserve areas.
Vertical filter: Choose which airspaces are shown on the map based on their vertical limit. The Up to option lets you select to display them up to a specific altitude, from FL10 to FL500. The default option All removes any filter. Alternatively, set them to show up to 1000 ft above your current altitude, or within a range of 1000 ft below to 1000 ft above your current altitude.
Class filter: Airspaces classified as A, B, C, D, Danger, Prohibited, Restricted, CTRs, TMZ and MATZ (MIL) will always be shown on the map. Additionally, you can choose to display other airspace classes by tapping on them in this list. A yellow checkmark will indicate that they are selected.
Note
Vertical filtering in this section also applies to NOTAM.
Guides#
Activate visual aids for your flight in this section.
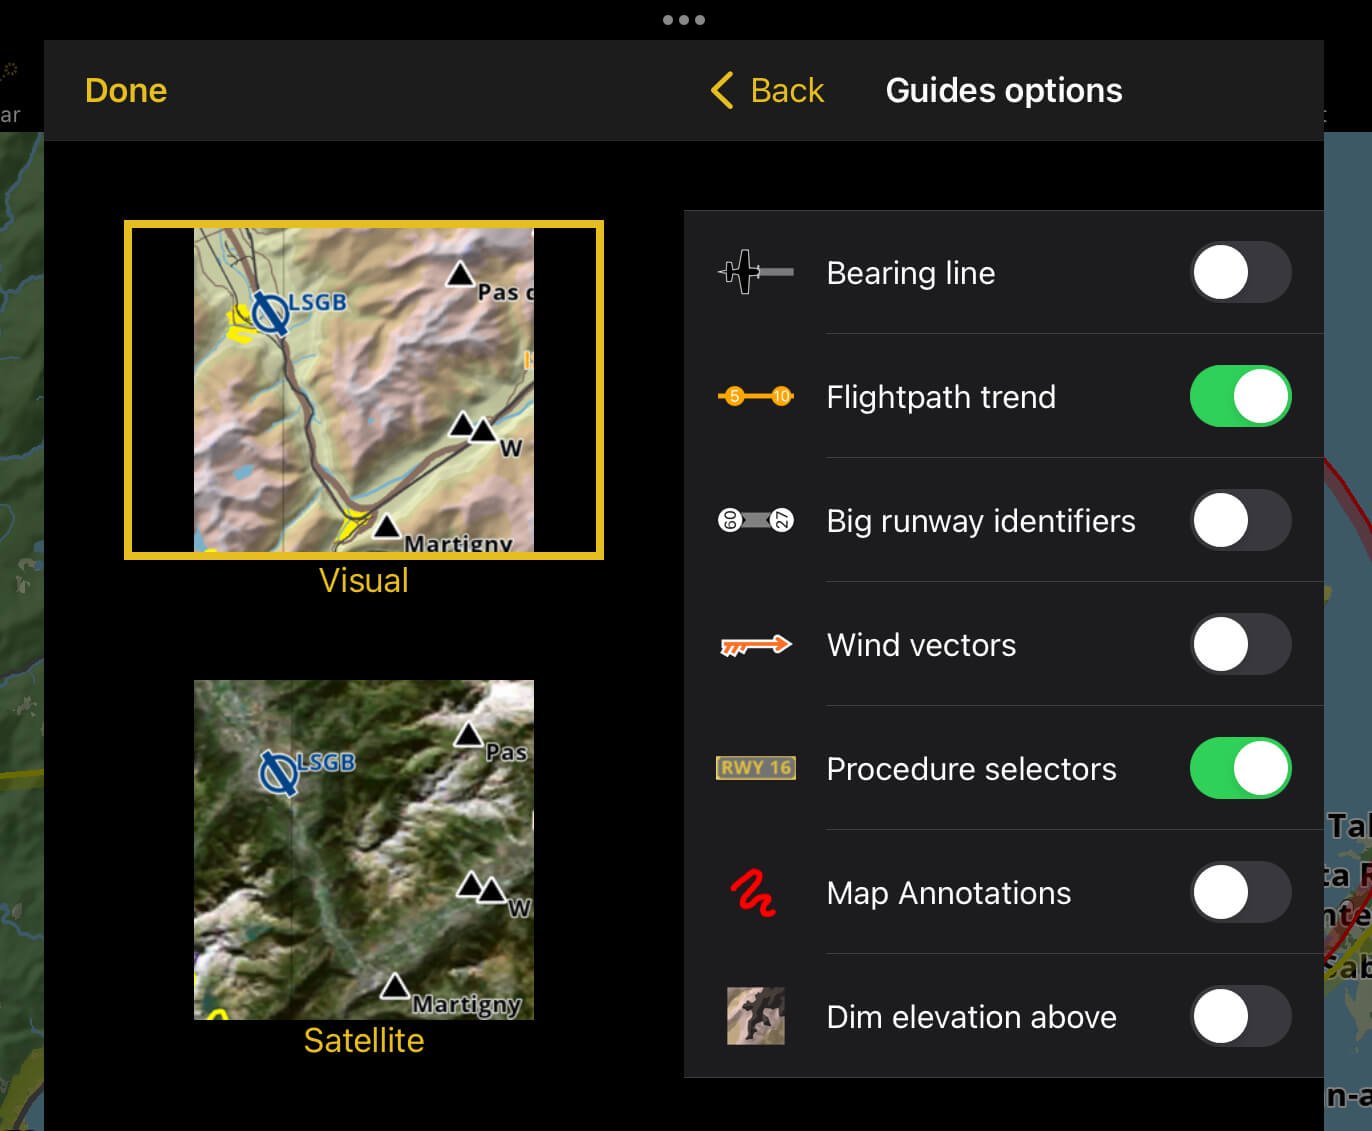
The app can display on top of the map guides that provide you with useful information for your navigation. You can toggle ON any of the following options:
Bearing line: A black line serves as visual reference indicating the direction to the next waypoint on your route.
Note
Bearing line only works properly if a route has been set beforehand.
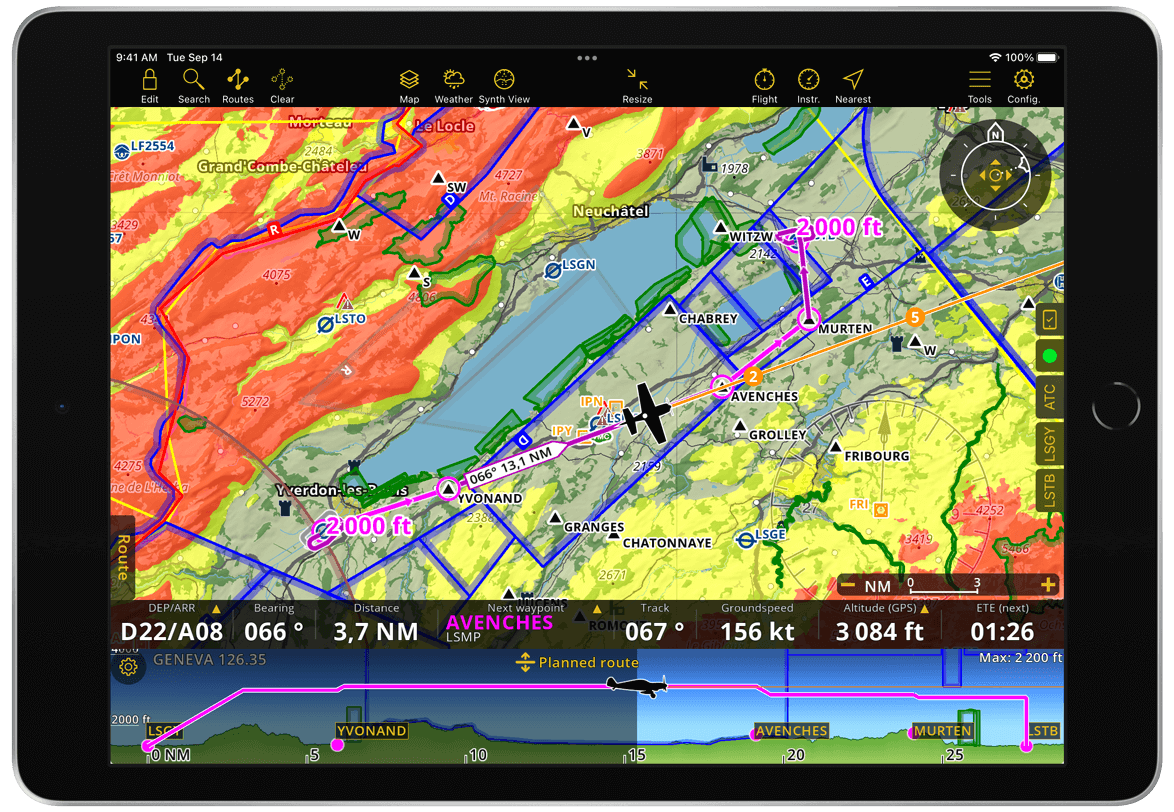
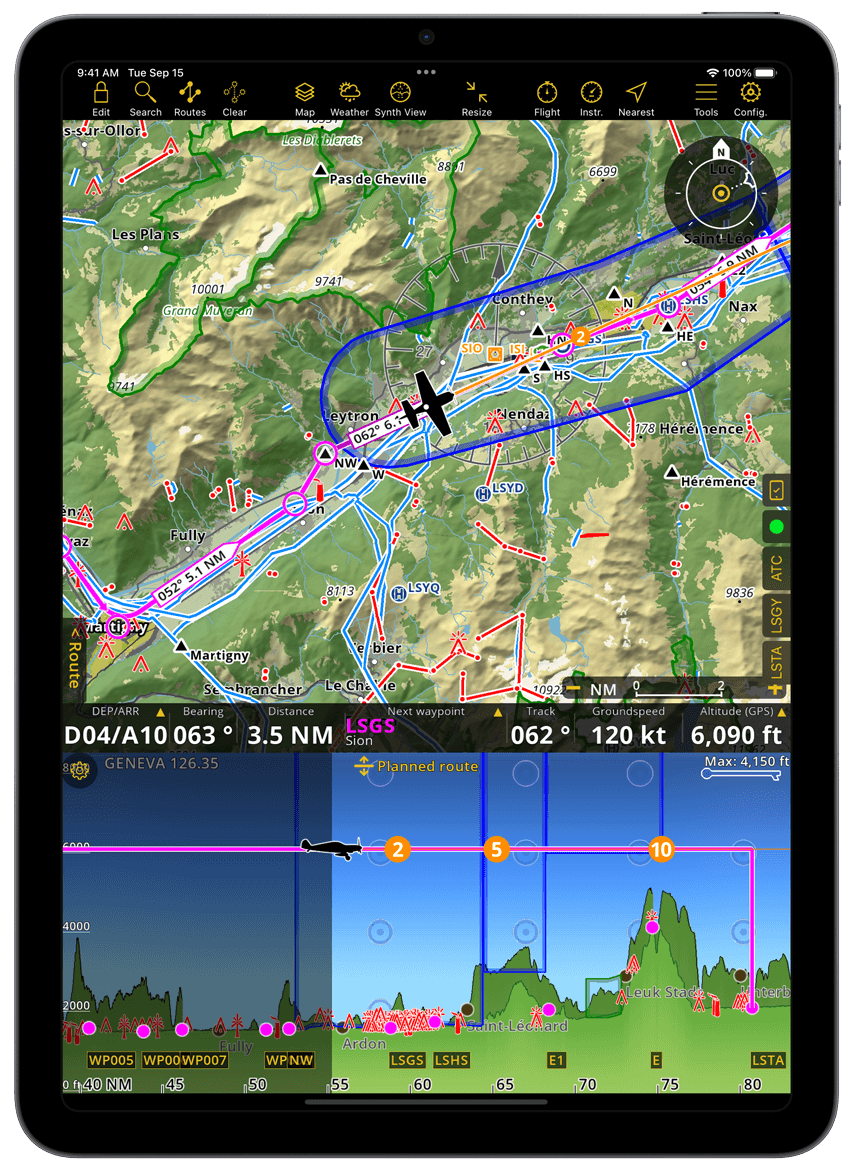
Flightpath trend: An orange line with 2, 5, 10 min indicators estimates your trajectory over time helping you to adjust your course or speed to ensure you reach the waypoints on your route within the desired timeframe. You can also display this guide on the Profile View.
Big Runway Identifiers: Instantly identify the first and last airports of your route with prominent runway indicators.
Wind vectors: Get live wind information displayed on the map at your current location and along your route. You can also display this guide on the Profile View.
Procedure selectors: Serve as shortcut to choose departing and arriving procedures directly on the map instead of the Navigation Bar by easily tapping on them.
Map Annotations: Highlight, draw geometrical figures and write with a marker directly on the map, for example, to annotate a relevant frequency or create your own airspaces. Activating this guide will display an additional toolbar on the Moving Map in Edit Mode.
Dim elevation above: Darken the map above a specific elevation for enhanced terrain awareness. When activated, a new field appears, allowing you to set the preferred elevation.
Maps#
Inside Map options > Maps you can manage the background layers of the Moving Map. The SmartChart is always displayed at the bottom. Additionally, you can acquire charts from our Store to display on top of it.
All installed charts will appear on the list here. Only selected charts, indicated by a yellow checkmark, are being displayed. The order of this list determines which chart is on top of the other. The first one is displayed above the second one, and so on. You may reorder the charts by dragging and dropping them using the symbol on the right.
Additional Layer Options#
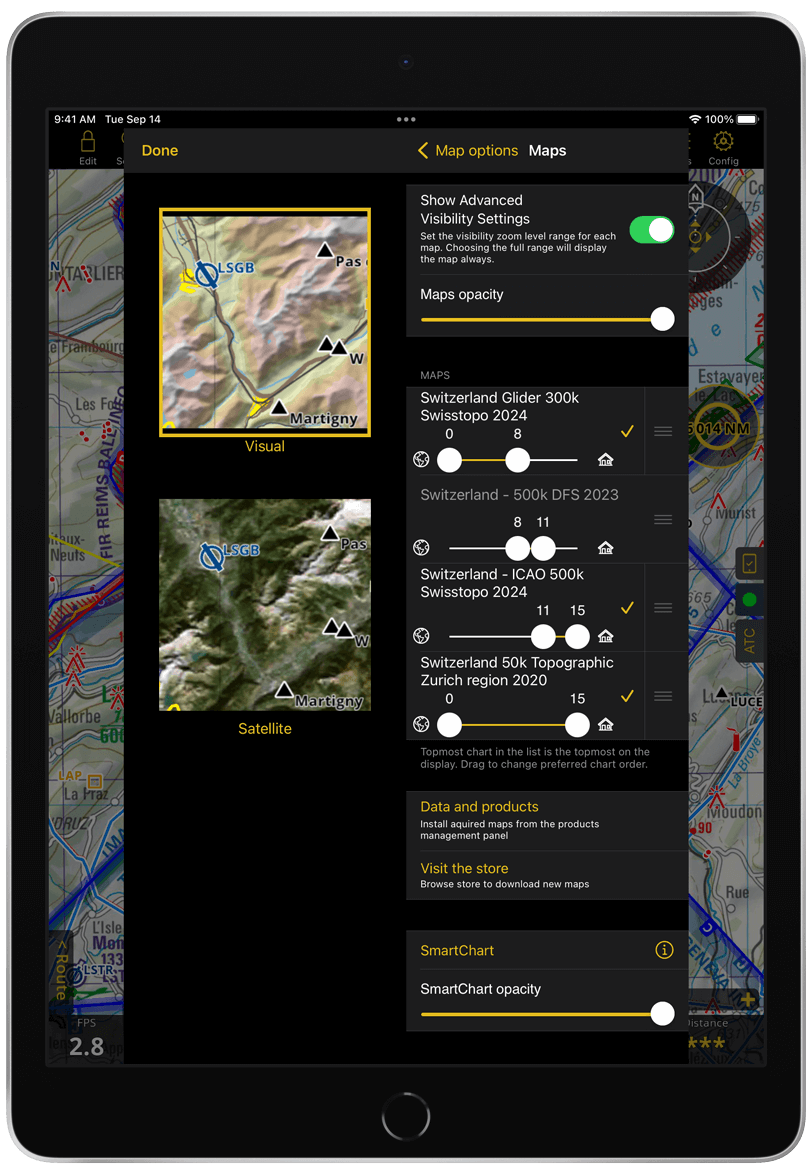
Show Advanced Visibility Settings: Toggle this option ON to display a double slider below each map. The slider ranges from 0 to 15, with 0 representing the most zoomed-out stage, symbolized by an earth icon, and 15 representing the most detailed view, symbolized by a house icon. These sliders allow you to control the overlapping of your maps by setting custom zoom level ranges for them. For example, in the image above, the 500k chart will be displayed until zoom level 8, the 100k chart from 8 to 11, and the 25k chart from 11 to 15. The app will display the map you want at each zoom level while zooming in and out.
Note
The toggle only shows or hides the sliders to collapse the information and keep the interface clear, especially when dealing with a long list of charts, but the set ranges will remain active even when the toggle is OFF.
Maps Opacity: This feature allows you to adjust the opacity level of your charts, enabling you to see the SmartChart beneath them. By default, the slider is set to the rightmost position, meaning the maps are 100% visible. Move the slider to the left to reduce the opacity and make the charts see-through. The selected opacity level will apply to all maps displayed on top of the SmartChart.
SmartChart Opacity: Similar to the above, this feature allows you to adjust the opacity level of the SmartChart, making it easier to see the aeronautical data and Map Annotations. By default, the slider is set to the rightmost position, meaning the SmartChart is 100% visible. Move the slider to the left to increase transparency.
NOTAM#
You may set display properties of the NOTAM from this menu. See NOTAM for description of our NOTAM management.
Obstacles#
From this menu, you can easily manage if and how Obstacles are displayed on the Moving Map. You can show or hide them, check if they are updated, install them if needed, vertically filter them based on your current altitude and customize their color.
Note
To have access to this obstacles menu, you need to have a subscription that includes an obstacle database or obstacles provided by your Air Navigation Manager organization.
Obstacles Options#
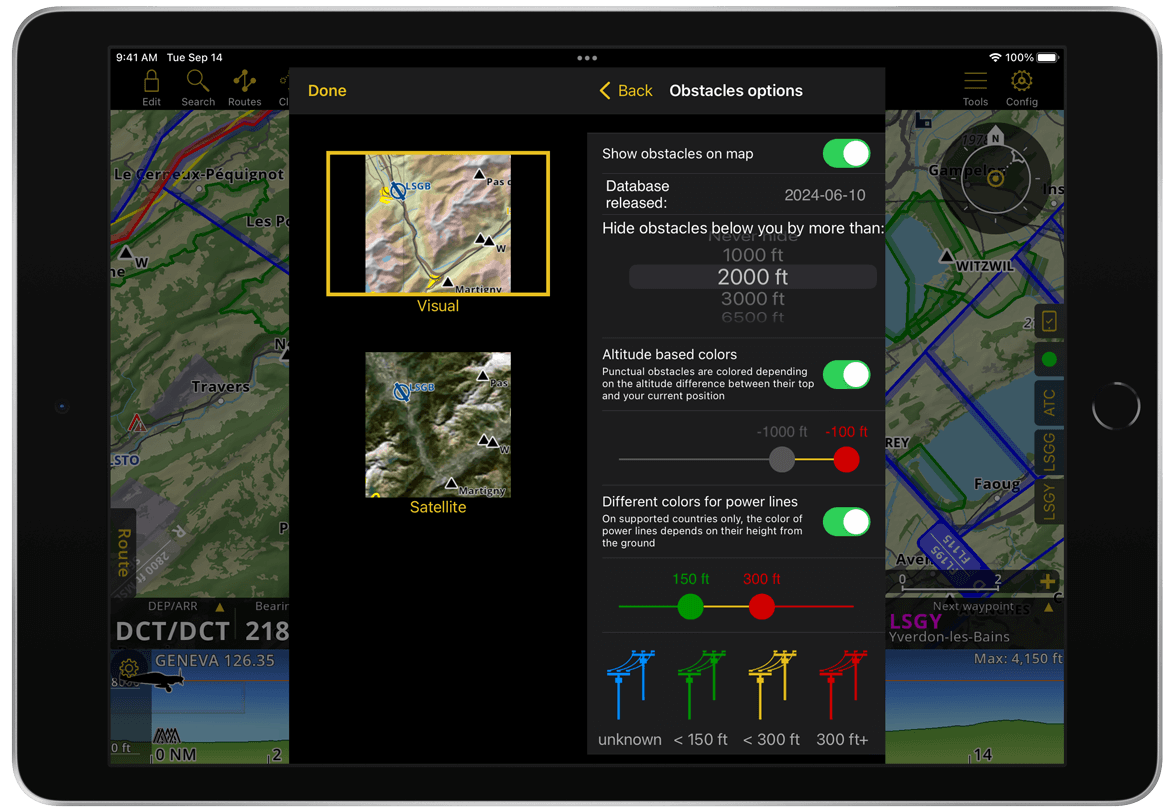
Show obstacles on map: If obstacles are installed on the app, you can easily toggle this option ON to display them on the Moving Map and OFF to hide them.
Download and install obstacles: This option appears only when the obstacles are not yet installed on the app. Simply tap this interactive text to start the downloaded process. You can also install the obstacles through Manage Data and Products.
Database released: Displays the latest release date of the obstacle database.
Hide obstacles below you by more than: This filter allows you to hide obstacles that are below your current altitude by more than a specific altitude difference. For example, if you select 2000 ft, obstacles more than 2000 ft below you won’t be displayed on the map. Choosing the Never hide option will show all the obstacles again.
Altitude based colors: This option colors obstacle points based on the altitude difference between their top and your current position. Toggle this option ON to reveal the double slider which lets you adjust the altitude thresholds for black, yellow and red obstacle coloring. Obstacles above your current altitude are always displayed in red. For obstacle points up to your current altitude, you can customize the values based on your operational needs. For example, in the image provided above, you can set the red limit to start 100 ft below your current altitude, yellow to span from 100 ft to 1000 ft, and black for obstacle altitude exceeding 1000 ft below your current level.
Different colors for power lines: With this option, you can color power lines based on their height above ground. Currently, this feature is only available for Norway. Toggle it ON to display the double slider that allows you to adjust the altitude thresholds for green, yellow and red power lines coloring. In the example above, green power lines are up to 150 ft from the ground, yellow power lines range from 150 ft to 300 ft, and red power lines start from 300 ft and above. When the height of the power lines is unknown, they are colored blue. A legend below the slider provides a quick reference of the current coloring levels.
Note
Colored power lines only work in Norway due to other countries not providing the required level of detail in their obstacle data. However, this restriction does not apply to power lines coming from your Air Navigation Manager organization. The coloring will be applied regardless of the country, as long as they are labeled as Power Support. Other obstacle types will not be colored.
Terrain awareness (TAWS)#
For additional terrain awareness, you can activate a color layer overlay on the Moving Map to easily identify whether the surrounding terrain is below, at or above your current altitude. Once toggled ON, a double slider allows you to set the altitude thresholds for the red and yellow coloring.
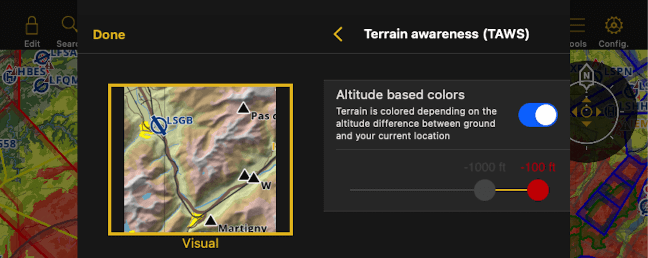
Terrain above your current altitude is always displayed in red. For terrain from ground level up to your current altitude, you can customize the values to suit different operational needs. For example, as shown in the image above, you could set the lower limit for red to begin 100 ft below your current altitude, and the yellow to cover the range from 1000 ft to 100 ft below your current position.
Terrain awareness works also in combination with the Synthetic View.
Traffic information#
This feature requires you to have an internet connection, an ADS-B, Safesky, or a FLARM device. You can choose here how traffics should be displayed on the map, as well as activating or deactivating alerts.
The Traffic information menu includes the following options:
Display traffic on map
Consider traffics at your altitude +/-
Appearance
Alerts on nearby/conflicting traffics
Safesky
Note
Seeing the traffic on the map requires either an internet connection, an ADS-B receiver, Safesky or a FLARM device. Then turned on, the TCAS algorithm is working to predict conflicts. (See the Traffic collision).
Display traffic on map#
Set your traffic icon preference on Map Options > Traffic Information. Choose between the following options:
None (selected by default): no traffic icons displayed
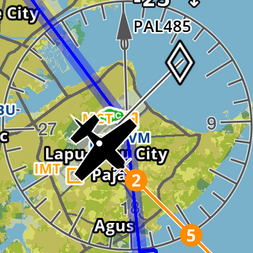
Generic symbols: traffic displayed as arrows
Aircraft Symbols: traffic displayed as representative icons based on the aircraft type: Unknown, Glider, TowPlane, Helicopter, Parachute, ParachuteDropPlane, Hangglider, Paraglider, Aircraft, Jet, UFO, Balloon, Airship, UAV, Obstacle, Ultralight, UAM_VTOL, and Gyrocopter
TCAS Symbols: traffic displayed using TCAS icons


Note
Traffic display on map is deactived by the default which may result in traffic not showing, even if a connection to a traffic information source has been successfully established.
Consider traffics at your altitude +/-#
Traffics can be filtered by altitude difference to avoid displaying irrelevant traffics. Only traffics that are within (+/-) the selected threshold will be displayed in that case:
2000 feet / 610 metres
3000 feet / 914 metres
4000 feet / 1219 metres
5000 feet / 1524 metres
6000 feet / 1829 metres
7000 feet / 2134 metres
8000 feet / 2438 metres
All
Appearance#
You can further customize the appearance of the traffics displayed:
Show tail number
Larger symbols
Alerts on nearby/conflicting traffics#
Get immediately notified in case of nearby conflicting traffic directly on the map. You have the option to enable alerts by type:
Visual alerts
Audio alerts
Choose one or both as preferred. Audio alerts will be reproduced in the language set for the app.
To ensure alerts function, make sure you have:
connected the app to a Traffic Sources on sensors or to SafeSky via native integration
selected a symbol preference on the Display traffic on map section (if None is selected, traffic won’t be displayed!)
toggled on the preferred alert option on Map Options > Traffic Information > Alerts on nearby/conflicting traffics
Note
Traffic alerts will only work if take-off has been detected or triggered and GPS accuracy is good enough to display the current position of the aircraft on the map.
The traffic algorithm is smart and will only alert your of converging traffics. It distinguishes between two level of alerts:
Traffic Information: Alerts about nearby traffics on a collision course that are less than 45 seconds away
Traffic Warning: Alerts about nearby traffics on a collision course that are less than 20 seconds away
SafeSky#
Our subscription plans (Smart Lite, Smart Classic and Smart Advanced) include a SafeSky subscription. You can turn on this feature to have SafeSky’s live traffic data directly displayed on the map and stream your position to SafeSky’s servers as soon as a take-off is detected. Thanks to this native integration, there is no need to download SafeSky’s app nor to have it open in the background or as split screen anymore. As part of the activation, you will be requested to enter an e-mail address and an aircraft registration (in case no aircraft has been set yet). You can deactivate this feature at any time.
To benefit from SafeSky’s real-time traffic information, follow these steps:
Check you have app version 8.3.200 or higher
Get or upgrade to one of the new subscription plans: Smart Lite, Smart Classic or Smart Advanced
Go to Map Options > Traffic Information > SafeSky and toggle on Connect to SafeSky
Accept the Terms of Use and follow the given instructions
Check that you have selected a symbol preference on the Display traffic on map section (if None is selected, traffic won’t be displayed!)
Once you are connected to SafeSky and selected any display traffic style, traffics will be displayed around the center of the map or your current location when flying.
Important
By connecting to SafeSky you agree to their Terms and Conditions. Open the Terms of Use link to read the information.
Note
SafeSky is a collaborative traffic sharing service using data connection of your device. Connecting to SafeSky requires a subscription plan that includes the service.
Waypoints#
You can define here the waypoints to be displayed. You can show/hide our database, useful if you are using an own database (via Air Navigation Manager for example).
You may filter aerodromes with short runways, and you can filter to only show those with asphalt/concrete surfaces. Filtered aerodromes will be displayed dimmed and interaction with them is not possible.
Profile View#
Hide/show the profile view. Refer to Profile View for more information and customization options.
Color Theme#

Easily adapt your map appearance to changing light conditions. In Map options > Color Theme you can choose between Light, Dark or Automatic. Our Dark mode features red tones that are easier on the eyes, making it ideal for night flights. With Automatic mode, as the sun sets according to your device’s time settings, your map transitions into Dark mode, ensuring optimal visibility at all times.
Auto Map Recenter#
This feature centers the moving map to your GPS location after 10 seconds of inactivity while in flight. Since it only works when movement is detected, it shouldn’t interfere with your flight planning when you take breaks between interactions with your device.
The recenter feature is enabled by default, but you can toggle it ON/OFF as needed in Map options.
Note
A message will alert you that the map will be centered to your GPS location before the feature activates.