

User Interface#
Design Philosophy#
We developed Air Navigation Pro in conformity with EASA and FAA EFB design recommendations. The core of our app is the Moving Map, surrounded by menus to access the features. All windows display on top of the map, allowing you to easily return to it at any time. This design ensures that critical information is always accessible without disrupting the navigation experience.
For enhanced safety, our app has two modes: Edit Mode and Flight Mode. Edit Mode is intended for the flight preparation phase, while Flight Mode is to be used during the flying phase, as it locks the route and prevents you from making unintentional changes to it during the flight.
The color scheme decisions are deliberate, with informative text always in white, while all tappable interactive elements are yellow. Red indicates caution and appears rarely, ensuring it stands out when necessary.
We focus on responsiveness and the use of intuitive finger gestures to ensure an easy, quick and natural feel with common gestures that you are already familiar with. We view our app as a supportive tool for pilots, not a prescriptive one. We believe that the pilot is always in charge and the primary decision-maker. Therefore, most of the features in our app are fully customizable, allowing users to tailor the app to their specific needs and preferences.
UI Components#
While some aspects of the appearance may vary slightly, the app was designed to maintain consistency across platforms as much as possible.
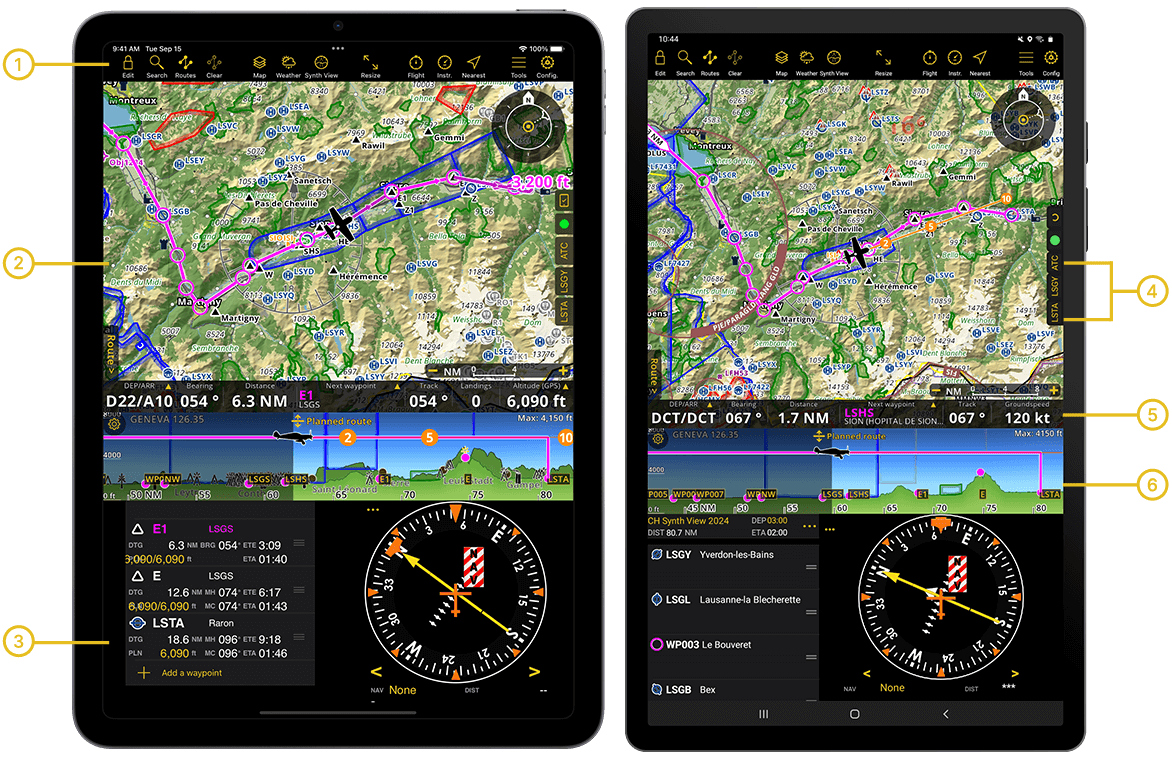
Tablet version#
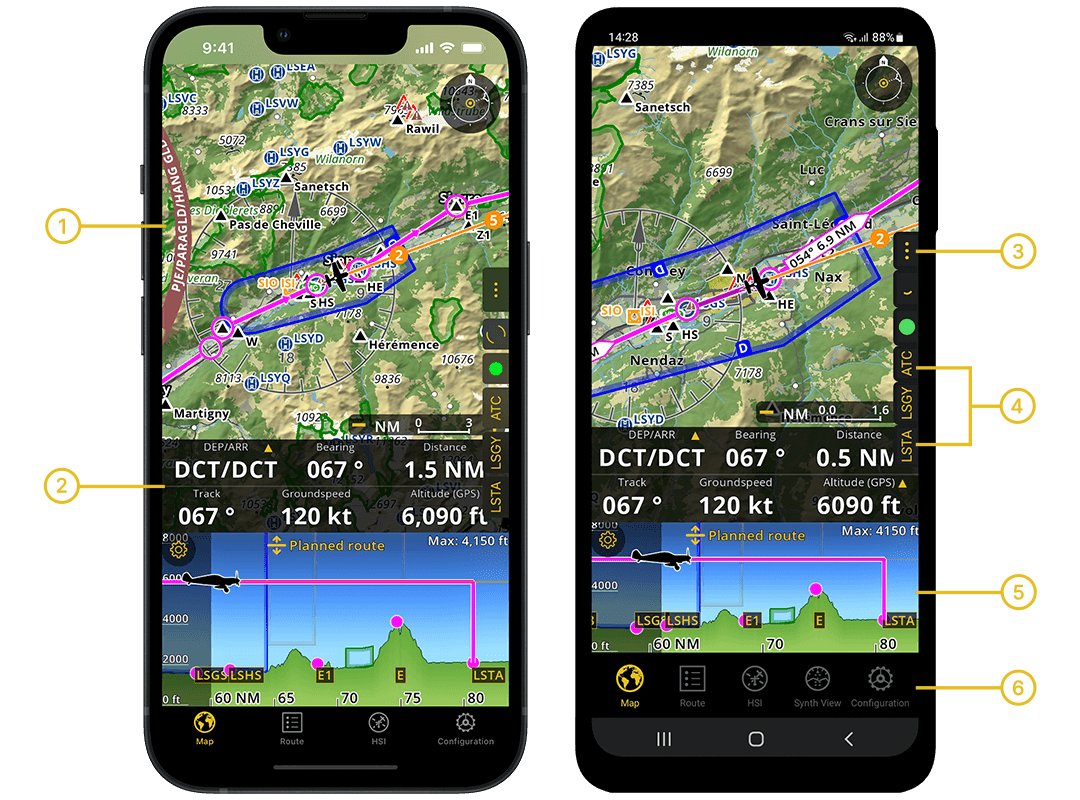
Mobile version#
While the tablet version can be used in either horizontal or vertical orientation, the app on mobile phones is locked in vertical mode.
Tablet Menu Bar#
From the Menu you will be able to access most of the functions of Air Navigation Pro.

Edit Mode#
![]() switches between Edit Mode and Flight Mode.
switches between Edit Mode and Flight Mode.
The open lock indicates you are in Edit Mode, allowing you to create and modify a route. Read more about Route Planning. Close the lock when you have finished your route and are ready to fly. In Flight Mode, the magenta route track is locked to prevent inadvertently changing your route while using the app in-flight.
Waypoint Search#
![]() Search among the official waypoints.
Search among the official waypoints.
Routes Menu#
![]() opens a popover menu displaying your routes history.
opens a popover menu displaying your routes history.
From here, you can save routes to access them from your other devices, view your organization’s routes and find shortcuts to create a route. Read more in Route Planning.
Clear#
![]() removes the currently active route.
removes the currently active route.
If an approach chart is displayed on the map, tapping this icon will open a popover where you can choose to hide it.
Map options menu#
![]() Settings for the moving map: choose the layers of information to be displayed.
Settings for the moving map: choose the layers of information to be displayed.
Weather#
![]() activates and deactivates the advanced weather layers.
activates and deactivates the advanced weather layers.
This feature displays weather related layers on top of the map thanks to our collaboration with MeteoBlue and Deutscher Wetterdienst. More details in Weather.
Synthetic View#
![]() turns on/off the Synthetic View.
turns on/off the Synthetic View.
This feature displays a 3D representation of the terrain, using the internal gyroscopes and accelerometers of your device to compute the pitch and roll angles. The Synthetic view is included on the Smart Classic and Smart Advanced subscription plans only.
Resize#
![]() On tablets only. Tap this to resize the screen and display the Navigation Dashboard as well as an additional instrument.
On mobile phones, you can access it by the Route module in the menu.
On tablets only. Tap this to resize the screen and display the Navigation Dashboard as well as an additional instrument.
On mobile phones, you can access it by the Route module in the menu.
Flight#
![]() Display or edit your current Flight times, Aircraft and set Alerts parameters.
Display or edit your current Flight times, Aircraft and set Alerts parameters.
Instrument#
![]() Simulated aeronautical instruments: HSI, Altimeter, Chronometer, Compass, Flight info, RMI, Speed, VOR, and Variometer.
For tablets, you can assign one instrument to the main view and access others from the menu.
On mobile phones, you can assign one instrument to the module tabs and access others from Configuration > Instruments.
Simulated aeronautical instruments: HSI, Altimeter, Chronometer, Compass, Flight info, RMI, Speed, VOR, and Variometer.
For tablets, you can assign one instrument to the main view and access others from the menu.
On mobile phones, you can assign one instrument to the module tabs and access others from Configuration > Instruments.
Nearest Route#
![]() creates a direct route from your current GPS position to the nearest airport.
creates a direct route from your current GPS position to the nearest airport.
This feature helps you find the closest landing option in case of an emergency. Read more in Route Planning.
Tools#
![]() On tablets only. Access to advanced modules such as User Waypoints, ScratchPad, Documents,
Imported KML files, Logbook, Flight recorder and Sensors.
On tablets only. Access to advanced modules such as User Waypoints, ScratchPad, Documents,
Imported KML files, Logbook, Flight recorder and Sensors.
On mobile phones, its elements are part of Configuration.
Configuration#
![]() Set units, change the application behavior and create your Air Navigation account.
Here you will also find the Store to install third-party products, like new charts.
Set units, change the application behavior and create your Air Navigation account.
Here you will also find the Store to install third-party products, like new charts.
Note
On tablets, the Menu bar is at the top of the screen. On mobile phones, it is accessed inside a drawer on the right side of the screen.
Navigation Dashboard#
The Navigation Dashboard displays your current active route along with the main Instrument.
Route Overview#
At the top, you will see the Route’s Name, Departure Time and total route distance in nautical miles (NM). Below, your route’s waypoints are listed along with key flight details.
In Edit Mode, waypoints display:
Distance to Next Waypoint (DIST)
Planned Altitude (PLN)
Magnetic Heading (MH)
Magnetic Course (MC)
Estimated Time En Route to Next Waypoint (ETE)
Groundspeed (GS)
In Flight Mode, waypoints display:
Distance to Go (DTG)
Planned Altitude (PLN)
Bearing (BRG)
Magnetic Heading (MH)
Magnetic Course (MC)
Tapping on a waypoint opens a pop-up window, where you can access various actions and settings.
Waypoint Pop-up Window#
In Edit Mode, you can further configure route details. See more in Route Planning. In Flight Mode, you can enter actual fuel on board and actual time over for each waypoint. This data is used in the Post Navigation log document.
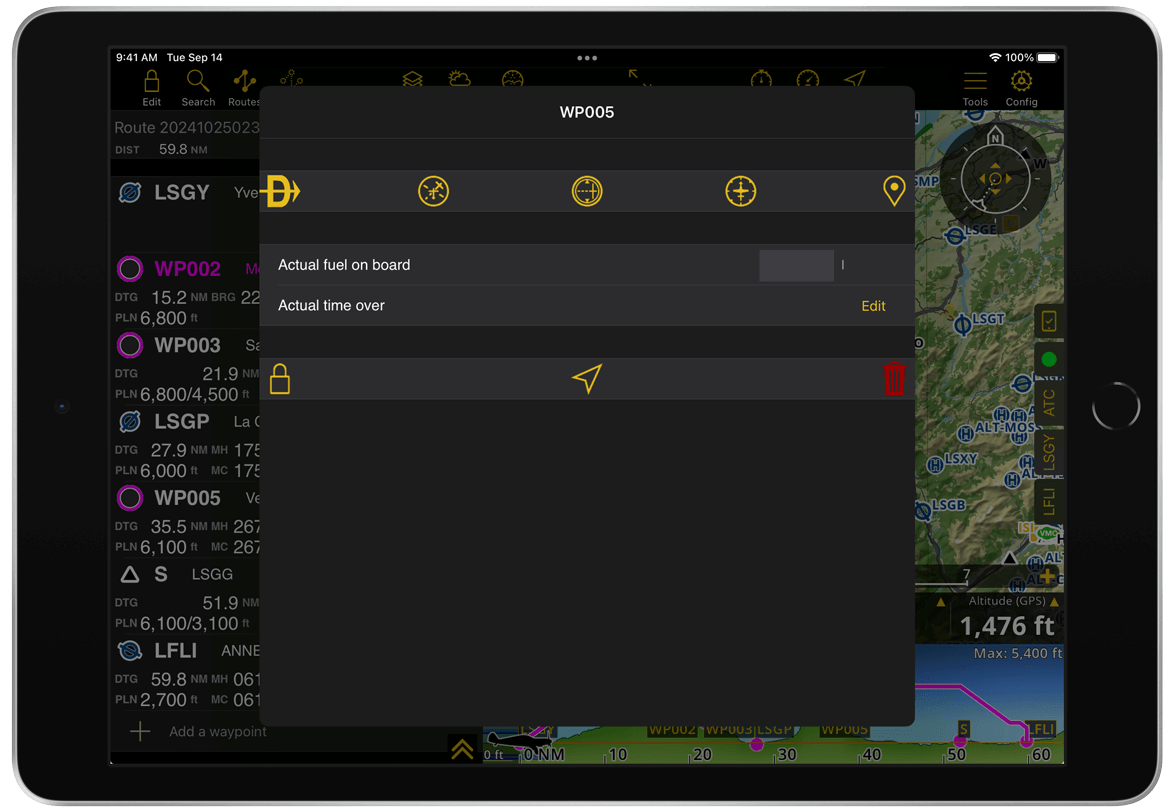
Additionally, the following shortcuts are available:
 replaces your current route with a direct route from your current GPS position to the selected waypoint.
 simulates a HSI for the selected waypoint.
 simulates a VOR for the selected waypoint.
 simulates a RMI for the selected waypoint.
 centers the selected waypoint on the map.
![]() switches between Edit Mode and Flight Mode from inside the pop-up window.
switches between Edit Mode and Flight Mode from inside the pop-up window.
![]() sets the selected waypoint as the next destination.
sets the selected waypoint as the next destination.
![]() removes the selected waypoint from your current route.
removes the selected waypoint from your current route.
Instrument Display#
The default Instrument is the HSI. By tapping the ![]() icon, you can access a list of available instruments to display. To hide the instrument, simply tap the
icon, you can access a list of available instruments to display. To hide the instrument, simply tap the ![]() icon.
icon.
Navigation Bar#
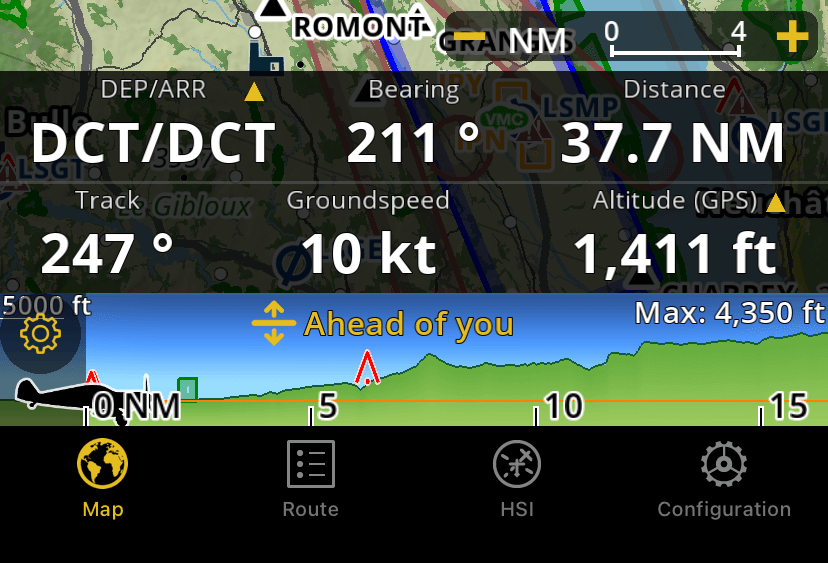
The Navigation Bar provides real-time navigation data tailored to your needs. The number of fields displayed depends on your screen size. You can choose navigation values from an extensive list of options, allowing you to prioritize the information most relevant to your flight.
Customization#
You can easily modify the value of any field on the Navbar to display the information you prefer. Simply long-press on the field you wish to change and a popover with a list of available options will appear. Scroll down to see more choices. Finally, tap on your desired value to select it.

Note
Some values require more space than others, so if you select larger information values to be displayed, the bar may contain fewer fields.
Additionally, the Navbar is intelligently designed to prevent duplicate information. For example, if you replace Groundspeed with Altitude but Altitude is already displayed in another field, the two values will swap places rather than Altitude appearing twice.
Mobile Version Specificities#
Considering the small screen size, the mobile Navbar has been designed to adapt to your needs at each stage of your flight experience. With no route, the Navbar displays a single row, offering a larger map area for Route Planning.
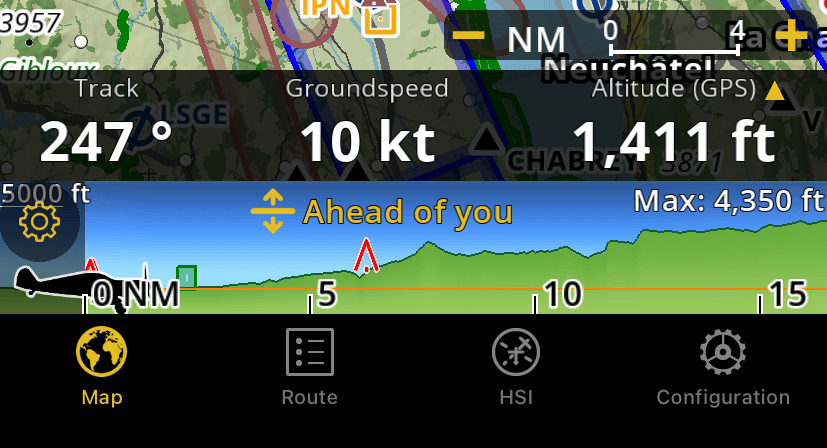
Once a route is set, the Navbar automatically expands to two rows, providing more information during your flight navigation. Additionally, the two rows serve distinct purposes:
Top Row: Customizable with fields related to your route, such as Next Waypoint, Distance or Planned Altitude.
Bottom Row: Customizable with fields related to GPS or external sensor data, like Track, Altitude, Acceleration or Vertical Speed.
Note
Some values require more space than others, so if you select larger information values to be displayed, the row may contain fewer fields.